Posts by adminjosh
DM Flowchart Designer

Built For MacOS
Flowcharts made beautiful
A native Mac app for creating professional flowcharts, process maps, and decision trees. Powerful styling. Intuitive canvas. Zero learning curve.
Everything you need
Professional diagramming tools without the complexity
Designed for the way you work
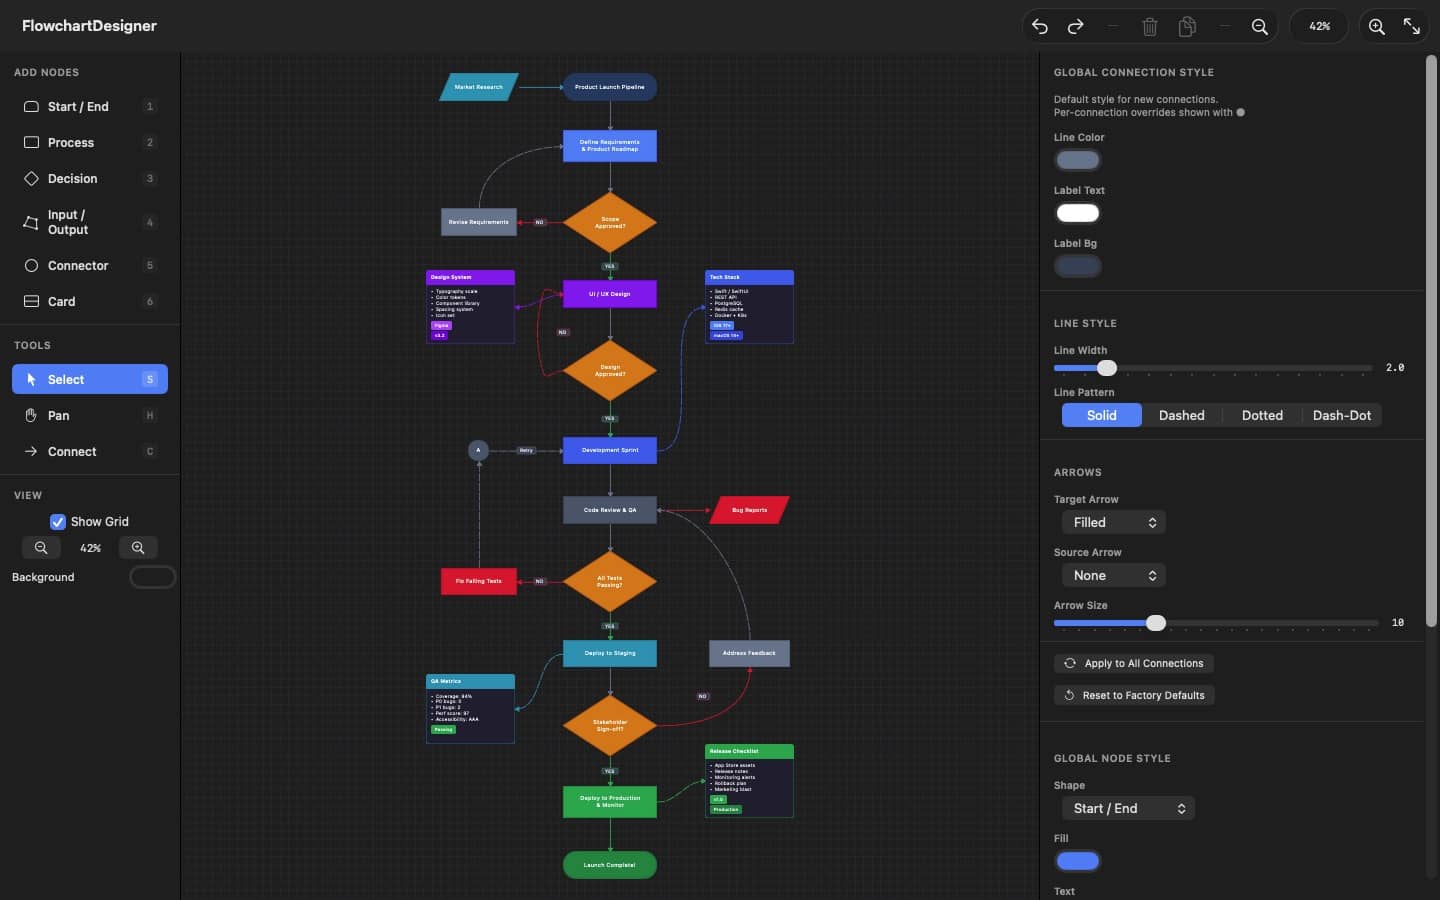
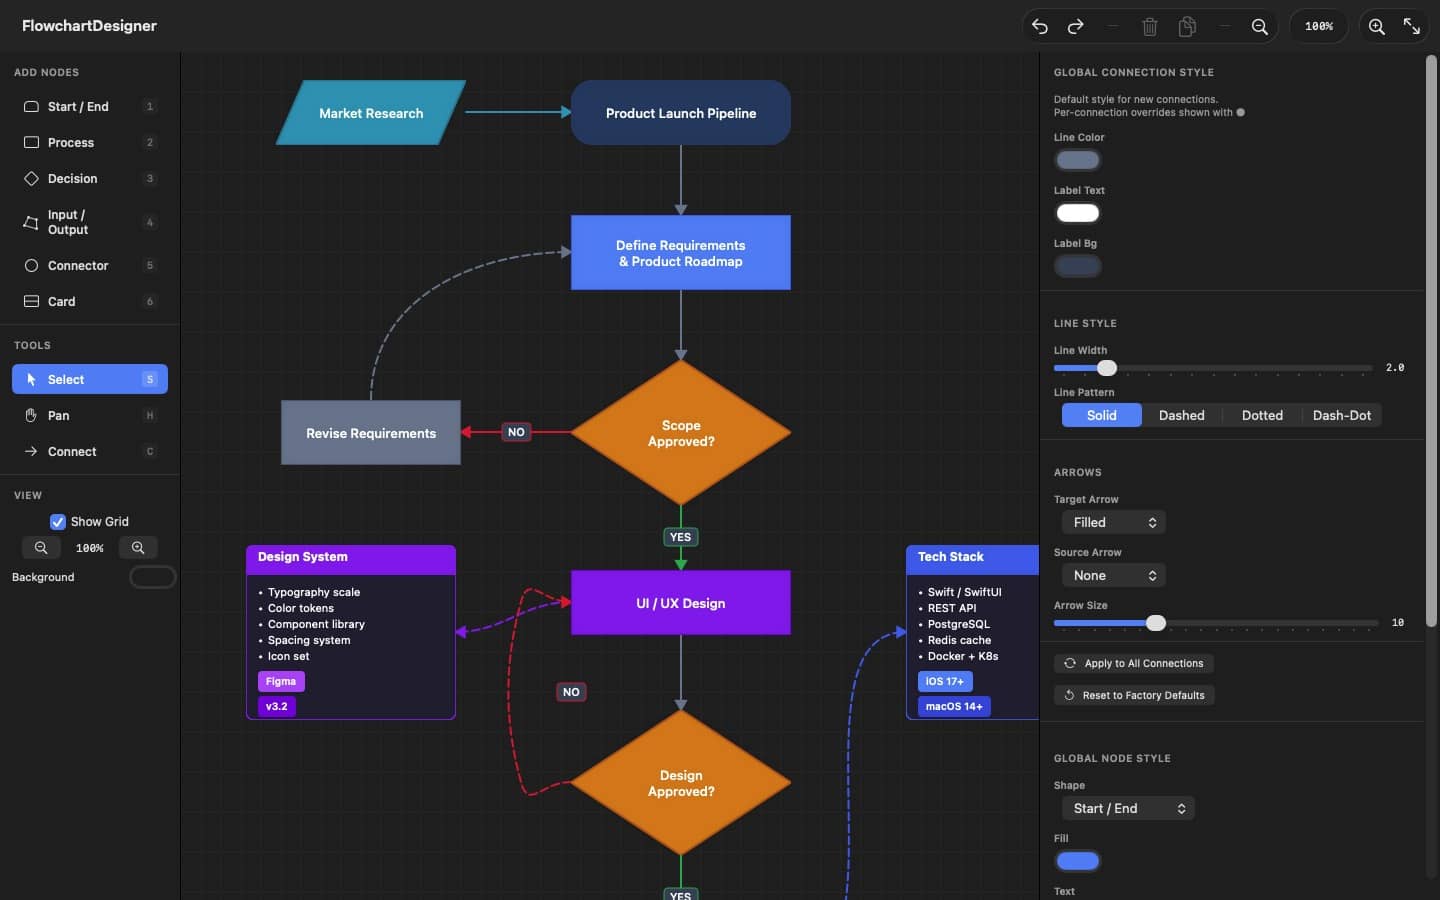
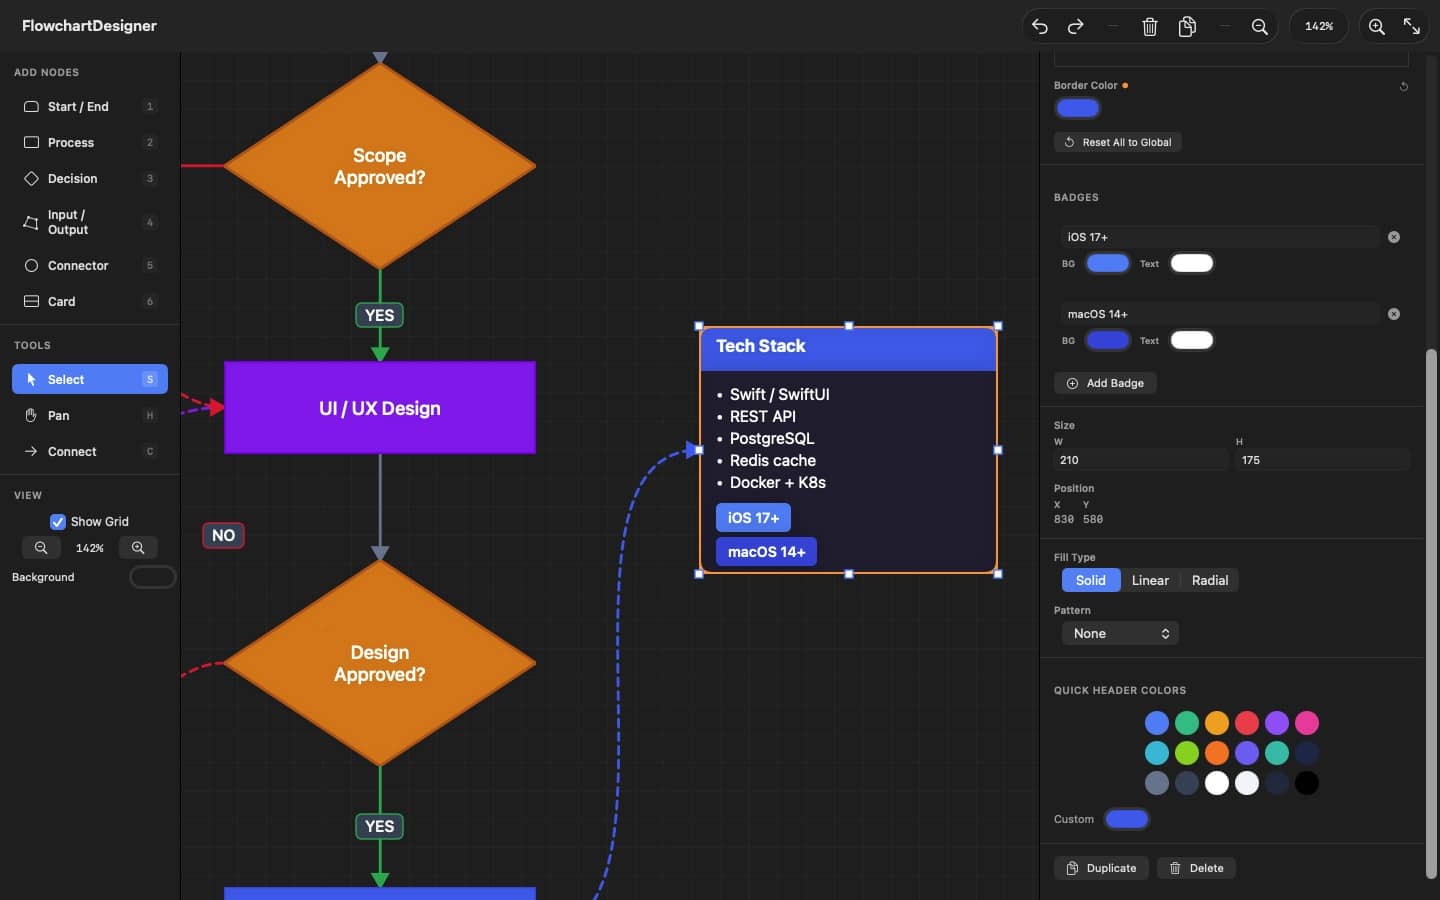
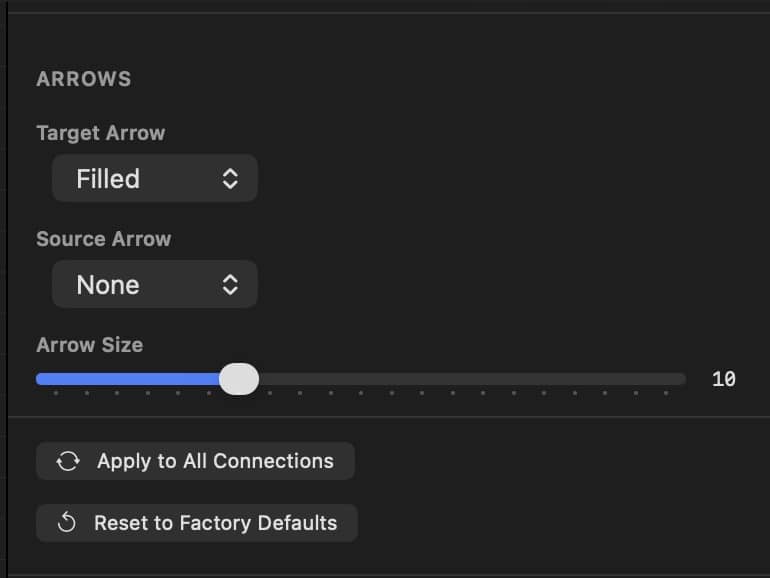
DM Flowchart Designer is built around a keyboard-driven workflow inspired by professional design tools. Hold spacebar to pan like Adobe apps, press number keys to add nodes instantly, and use single-key shortcuts for every tool.
An infinite canvas with smooth zoom from 15% to 400% means your diagrams are never constrained. Snap-to-grid keeps everything aligned without the fuss.
Adobe-style spacebar hold to pan
Number keys 1-6 for instant node creation
Infinite canvas with 15%-400% zoom
Grid snapping for precise layouts
Full undo/redo history
Double-click to edit text inline
Optional GPU rendering via Metal
Native macOS document support
Keyboard first
Every action at your fingertips
1-6
Add node by type
S
Select tool
C
Connect tool
H
Pan tool
Space
Duplicate selection
F
Fit all nodes to view
⌘ D
Duplicate selection
⌘ E
Export as PNG
⌘ ⇧ Z
Export as PDF
⌘ Z
DM Flowchart Designer Privacy Policy
Privacy Policy
Last updated: February 24, 2026
DM Flowchart Designer (“the App”) is developed by Joshua Jordan (“we,” “us,” or “our”). We are committed to protecting your privacy. This Privacy Policy explains how the App handles your information.
Data Collection
DM Flowchart Designer does not collect, store, transmit, or share any personal data or usage information. The App operates entirely offline on your Mac.
Local Data Only
All documents, settings, and preferences you create within the App are stored locally on your device. Specifically:
- Flowchart documents are saved as JSON files to locations you choose on your Mac.
- Exported images (PNG) and documents (PDF) are saved to locations you choose.
- App preferences are stored locally using macOS UserDefaults on your device.
None of this data is transmitted to us or any third party.
No Analytics or Tracking
The App does not include any analytics frameworks, advertising SDKs, or tracking technologies. We do not track your usage, behavior, or any other activity within the App.
No Network Access
DM Flowchart Designer does not require or use an internet connection. The App does not make any network requests.
No Accounts
The App does not require you to create an account or provide any personal information to use it.
Third-Party Services
The App does not integrate with any third-party services that could collect your data.
Children’s Privacy
The App does not collect any personal information from anyone, including children under the age of 13.
Changes to This Policy
We may update this Privacy Policy from time to time. Any changes will be posted on this page with an updated revision date.
Contact Us
If you have questions about this Privacy Policy, please contact us at:
DM Mobile Location, Privacy Policy
Overview
DM Mobile Location ("the App") is developed by Dependent Media. This privacy policy explains how we collect, use, and protect your information when you use our App.
Information We Collect
Location Data
The App collects your device's geographic location (latitude and longitude) only when you explicitly choose to:
- Tap on the map to set a location manually, or
- Enable GPS mode to use your current location
Address Information
When you set a location, the App uses Apple's geocoding service to look up the street address corresponding to that location.
Information You Provide
- Labels: Optional text descriptions you enter for your location (e.g., "Parked at Main & 5th")
- API Credentials: Your website URL and API key, stored locally on your device
How We Use Your Information
Your location data is used solely to:
- Display your position on the map within the App
- Send your location to your own WordPress website when you tap "Update Location"
- Collect or store your location data on our servers
- Share your location with any third parties
- Use your location for advertising or tracking
- Sell any of your personal information
Data Transmission
When you update your location, the following information is sent directly to the WordPress website URL you configured:
- Latitude and longitude coordinates
- Street address (if available)
- Your custom label (if provided)
This data is transmitted using HTTPS encryption and is sent only to the server you specify.
Data Storage
On Your Device
- API credentials are stored locally using iOS secure storage
- No location history is stored on your device
On Your Website
- Location data is stored on your WordPress website
- You control this data through your WordPress admin panel
- Data retention is managed by you through your website
Third-Party Services
The App uses the following Apple services:
- MapKit: To display maps (Apple's privacy policy applies)
- Core Location: To access GPS when you enable GPS mode
- CLGeocoder: To convert coordinates to street addresses
We do not integrate any third-party analytics, advertising, or tracking services.
Your Rights
You have the right to:
- Access: View what location you've sent to your website via WordPress admin
- Delete: Remove your location data through your WordPress admin panel
- Revoke: Disable location permissions in iOS Settings at any time
Children's Privacy
The App is not directed at children under 13. We do not knowingly collect information from children under 13.
Changes to This Policy
We may update this privacy policy from time to time. We will notify you of any changes by posting the new policy within the App or on our website.
Contact Us
If you have questions about this privacy policy, please contact us at:
DM Mobile Location Help Center
🚀 Quick Start Guide
WordPress Plugin
- Upload
dm-mobile-location.zipvia Plugins → Add New → Upload - Activate the plugin
- Go to Mobile Location → Security and copy your API key
- Add
[dm_mobile_location]to any page
iPhone App
- Open the app and go to Settings
- Enter your API Endpoint:
https://yoursite.com/wp-json/dm-mobile-location/v1/location - Enter the API key from your WordPress admin
- Tap "Test Connection" to verify
🔧 Troubleshooting
"Invalid API key" error
- Make sure the API key matches exactly (no extra spaces)
- Check that the plugin is activated
- Try regenerating the API key in WordPress: Mobile Location → Security
"Connection failed" error
- Verify your website URL is correct
- Make sure your site uses HTTPS
- Check that WordPress REST API is enabled
Map not showing on website
- Verify the shortcode is correct:
[dm_mobile_location] - Make sure you've set at least one location from the app
- Clear any caching plugins
Location not updating
- Check that "Location updated" message appears in the app
- Clear your website cache
- Check the Security Log for any blocked requests
📝 Shortcode Reference
Basic usage:
[dm_mobile_location]
Options
height="500px"- Map heightwidth="100%"- Map widthzoom="15"- Zoom level (1-18)show="all"- Show all locationsid="loc_xxx"- Show specific location
Example with options:
[dm_mobile_location height="400px" zoom="14" show="all"]
DM Mobile Location
Let Customers Find Your Food Truck(s)
Let Employers Track Employees
Running a mobile business shouldn't mean your customers can't find you. DM Mobile Location is a simple solution that connects your iPhone to your WordPress website, letting you update your location with a single tap. Whether you're a food truck rolling to a new corner, a mobile groomer heading to the next appointment, or a field technician moving between job sites, your website instantly shows customers exactly where you are. No more answering "where are you today?" calls or updating social media every time you move—just tap, and your website handles the rest. With optional auto-update, your location even tracks automatically in the background while you focus on running your business.
Everything You Need
📍
One-Tap Updates
Set your location by tapping the map or using GPS. Update your website in seconds, not minutes.
🗺️
Interactive Map
Beautiful, customizable map on your website. Customers can get directions with one click.
📝
Custom Messages
Add labels like "Lunch special today!" or "Open until 3pm" that display on your map.
Auto Address Lookup
The app automatically finds the street address. No typing required.
Fully Customizable
Choose map styles, marker colors, popup designs. Match your brand perfectly.
🔒
Secure & Private
Your data goes to your website only. No tracking, no third parties, no ads.
How It Works
❶
Install the Plugin
Add the free WordPress plugin to your website in minutes.
❷
Get the App
Download the iPhone app and connect it to your website.
❸
Set Your Location
Tap the map or use GPS to set where you are.
❹
Customers Find You
Your website shows your location with directions.
Perfect For:
Whether you're running a food truck, managing a cleaning crew, or dispatching service technicians, DM Mobile Location helps your customers and team know exactly where to go. One tap updates your website map—no complicated software, no monthly fees.
Food trucks. Field crews. Delivery drivers. Sales reps. If your business moves, your customers and team need to know where you are. One tap. Updated. Done.
🚚 Food Trucks
☕ Coffee Carts
🥬 Farmers Markets
🛍️ Pop-Up Shops
🐕 Mobile Pet Groomers
🔧 Mobile Mechanics
🍦 Ice Cream Trucks
📦 Delivery Staging
🎪 Event Vendors
🔧 Field Service Technicians
🚿 Plumbers
⚡ Electricians
❄️ HVAC Technicians
🏠 Home Inspectors
🧹 Cleaning Crews
🌳 Landscaping Teams
🚛 Delivery Drivers
💼 Sales Reps
🏥 Home Health Aides
🔐 Security Patrols
🏗️ Construction Supervisors
🐜 Pest Control
💻 IT Support Techs
📸 Photographers
🍽️ Catering Teams
📦 Moving Crews
🏡 Real Estate Agents
📚 Mobile Tutors
✍️ Notary Services
Automatic Payment Subscriptions
Can Client Sync be set up for monthly automatic payment subscriptions? I have a client who wants a subscriber to get 4 meetings a month for a set price.
Yes, absolutely.
Based on the code structure we have been working with (specifically the Pro Memberships Module), this is exactly what that feature was designed to do.
You will need the Client Sync Pro add-on and the WooCommerce Subscriptions plugin.
Here is the exact workflow to achieve “4 meetings a month for a set price”:
1. The Setup Logic
You are going to create a Membership Plan in Client Sync that acts as a “rule set” (e.g., “Allow 4 bookings per month for free”). Then, you will link that rule set to a WooCommerce Subscription product that handles the recurring billing.
2. Step-by-Step Configuration
Step A: Create the Membership Plan
- Go to Client Sync > Memberships (or
Forms->Add New->Membership Plandepending on your menu structure). - Title: “Monthly Consulting Plan”.
- Add Rule:
- Apply To: Select “All Services” (or a specific service like “Consulting Call”).
- Rule Type: Booking Limit.
- Value: 4.
- Period: Per Month.
- (Note: Based on your
Membership_Rules_Enginecode, if a user is under their limit, the price automatically becomes $0.00 in the cart).
- Save the plan.
Step B: Create the WooCommerce Product
- Go to Products > Add New.
- Product Type: Simple Subscription (requires WooCommerce Subscriptions plugin).
- Price: Set the monthly fee (e.g., $200 / month).
- Publish the product.
Step C: Link Them
- Go back to your Client Sync Membership Plan from Step A.
- Look for the “WooCommerce Subscription Link” meta box in the sidebar.
- Search for and select the Subscription Product you created in Step B.
- Save.
3. How it works for the Customer
- Purchase: The client buys the subscription on your site via WooCommerce.
- Activation: The
WC_Subscriptions_Integrationclass in your code detects the payment and automatically tags that user account with the Membership Plan ID. - Booking:
- The user logs in.
- They go to the booking form.
- Bookings 1-4: The system sees they have a membership. It shows the price as $0.00 (Included in Membership) and lets them book instantly.
- Booking 5: The system checks the
_get_user_usage_for_periodlogic, sees they hit the limit of 4, and either blocks the booking or charges the full normal price (depending on how you set up additional rules).
- Renewal: Next month, WooCommerce charges the card. The membership stays active, and the usage counter resets to 0 automatically.
- Cancellation: If they cancel payment, the integration code removes the membership flag, and they can no longer book for free.
Client Sync Pro
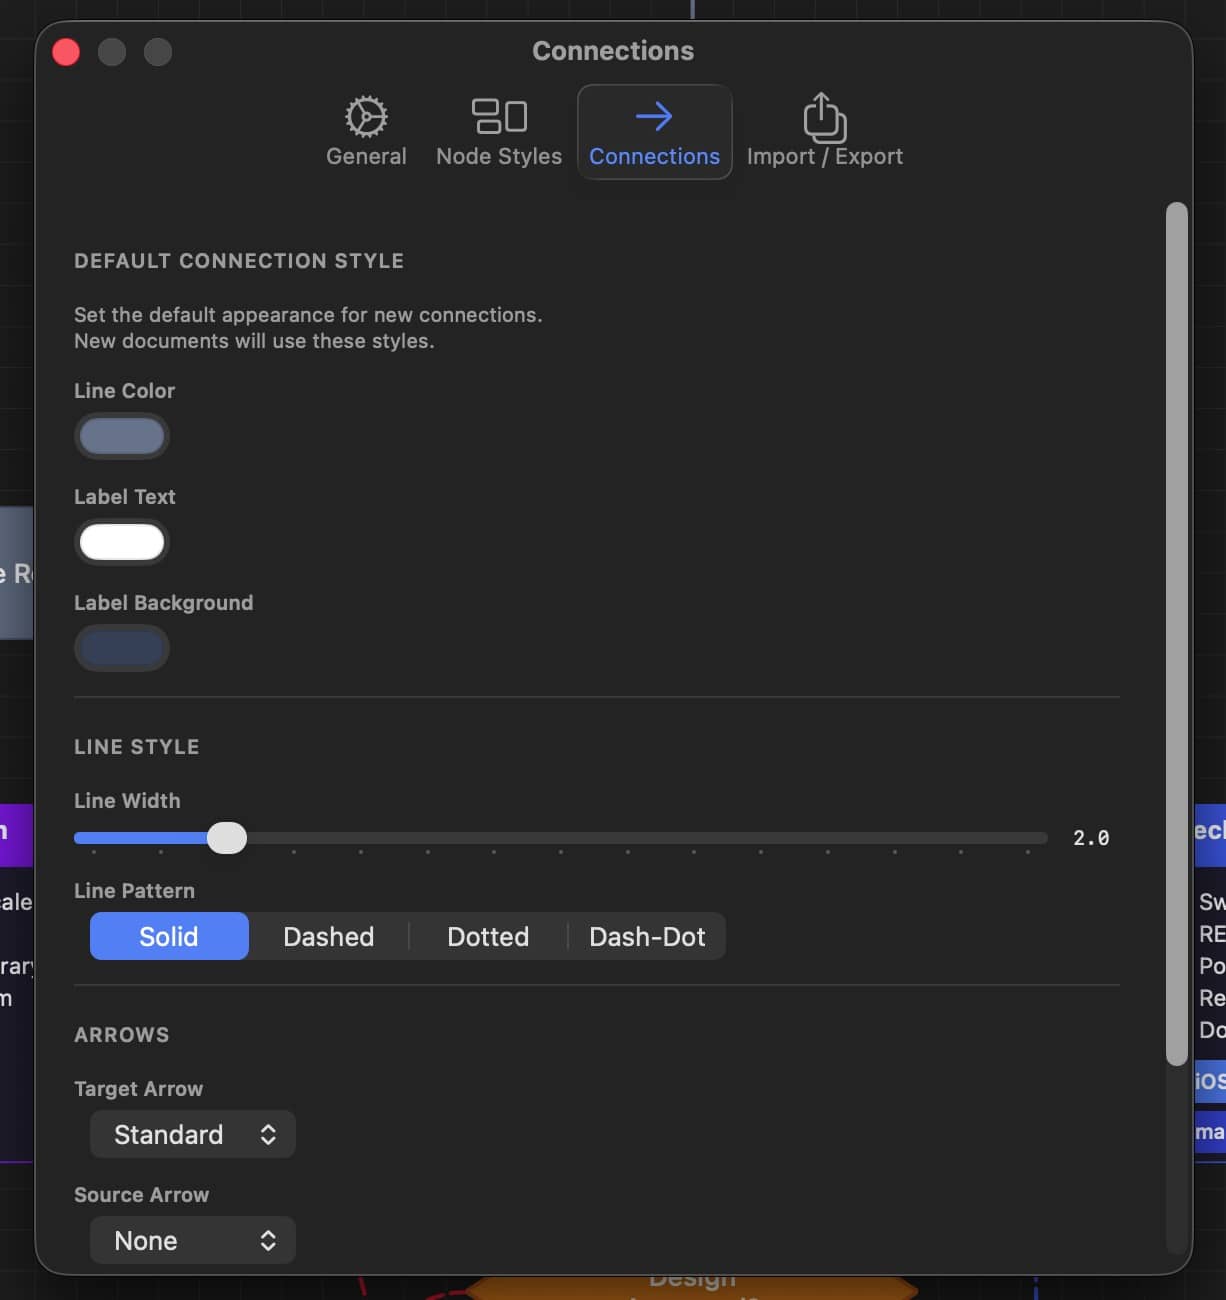
Stop Wrestling with WordPress Bookings. Meet Client Sync Pro.
Stop Wrestling with WordPress Bookings. Meet Client Sync Pro.
If you run a service-based business, you know the nightmare: You have a client who wants an appointment, a staff member who needs to be free, and a specific room or piece of equipment that must be available—all at the same time. And for medical practices, you have the added burden of keeping that data secure.
Most WordPress plugins crumble under that complexity. They either slow down your site, force you into a rigid box, or leave sensitive data exposed.
Enter Client Sync Pro.
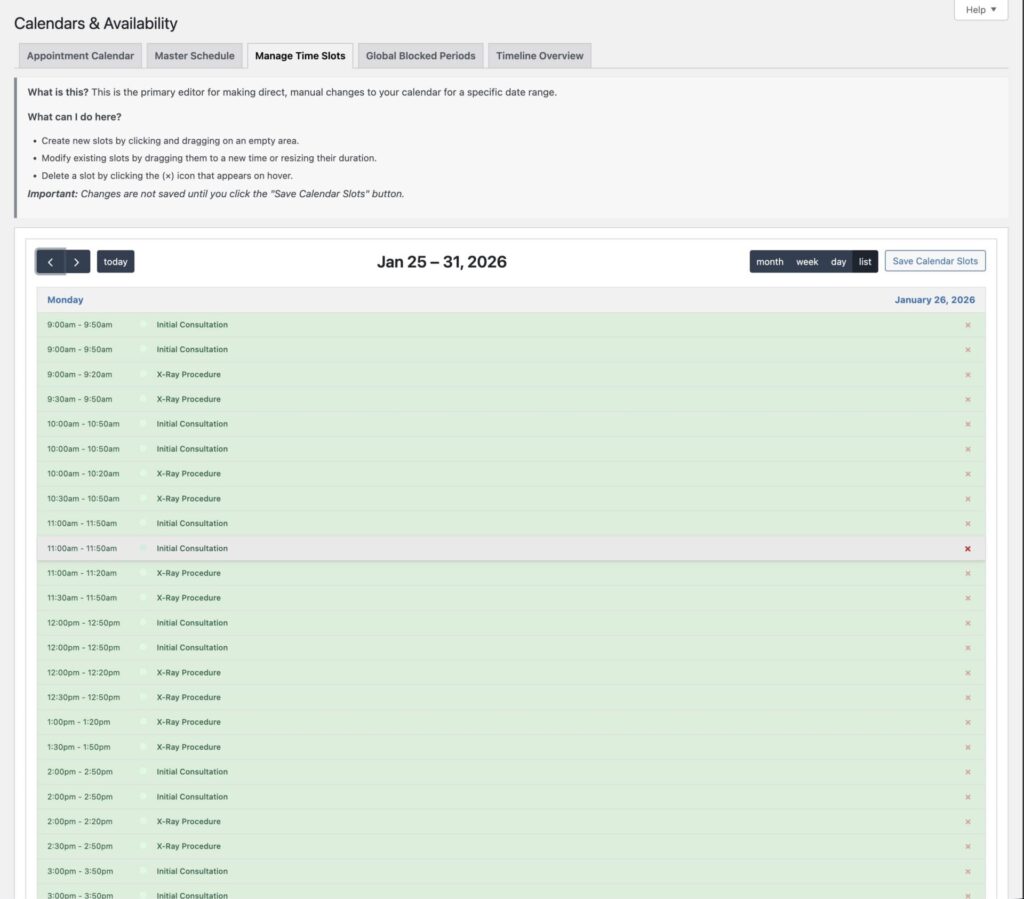
Built on a high-performance architecture using custom database tables, Client Sync isn’t just a calendar—it’s a complete logic and security engine for your business.
Built on a high-performance architecture using custom database tables, Client Sync isn’t just a calendar—it’s a complete logic and security engine for your business.
Why Pro changes the game:
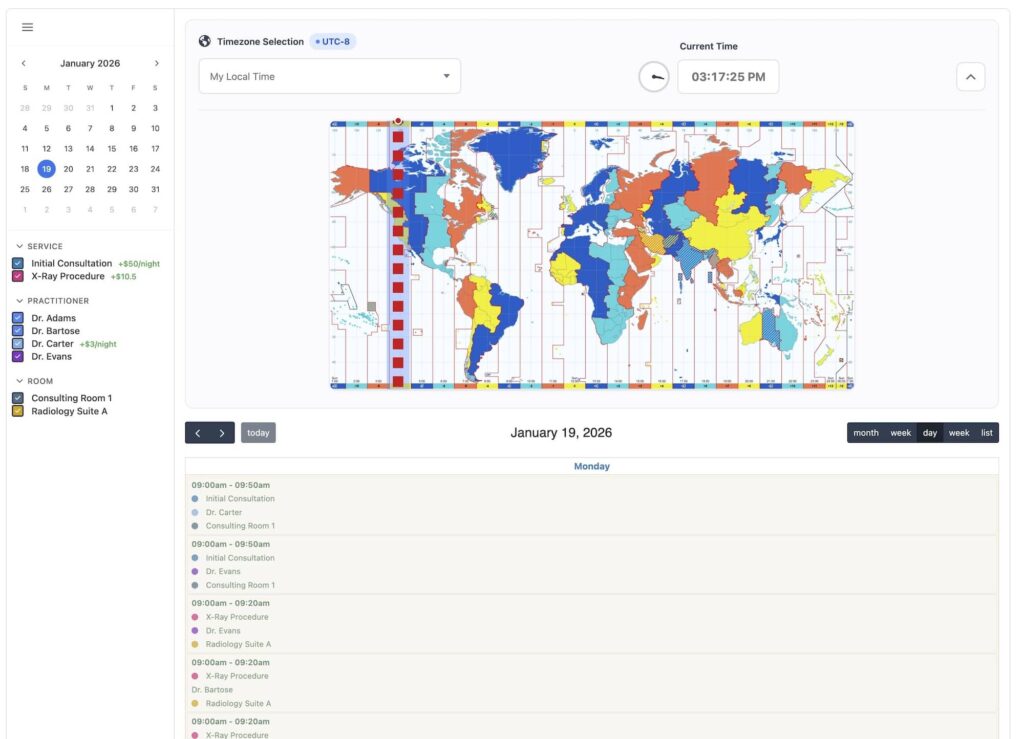
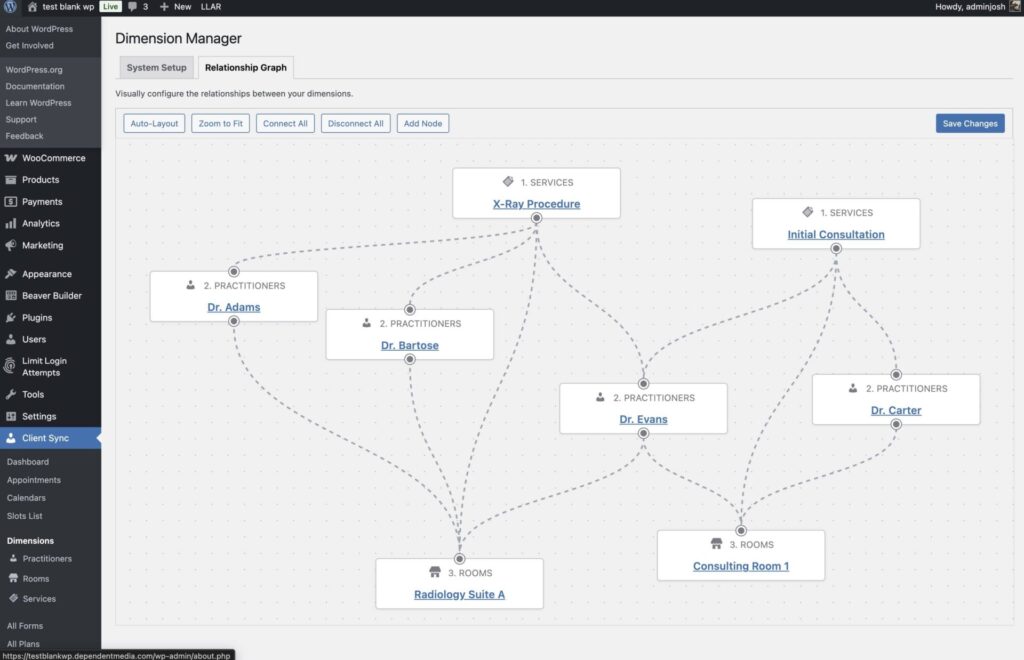
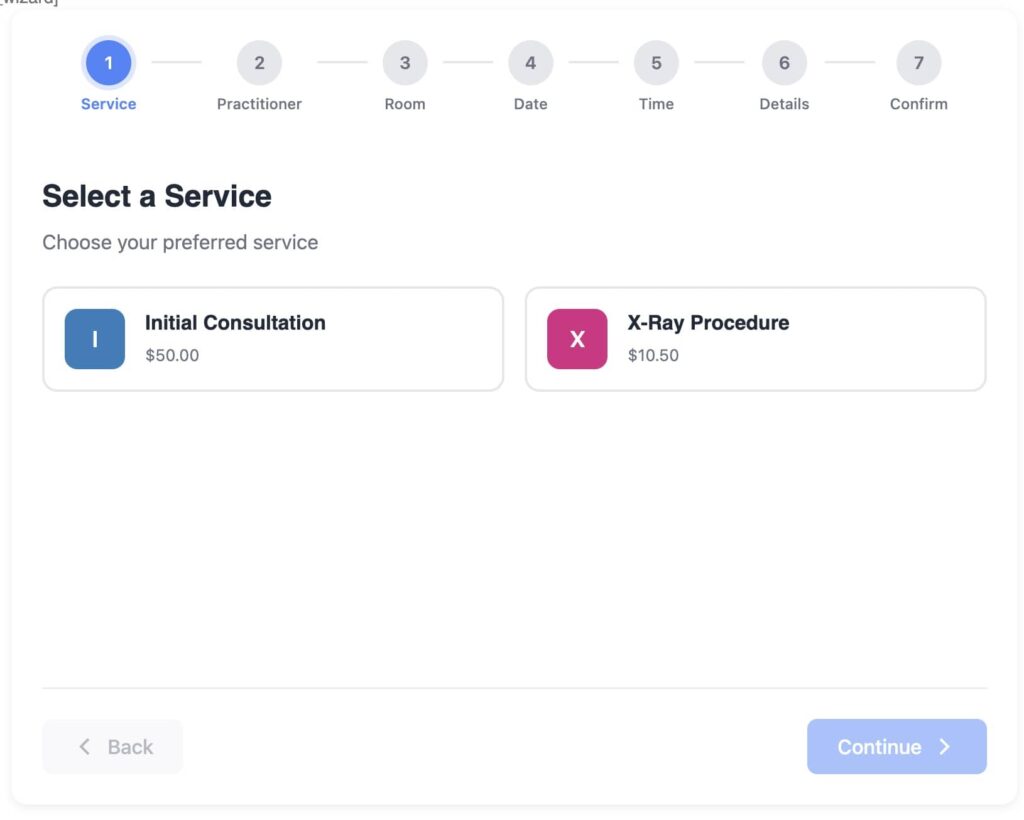
- 🧩 True Resource Scheduling: Do you rent boats? Manage a medical clinic? Run a salon? With our unique "Dimensions" system, a booking is only confirmed if the Service, the Staff Member, AND the Room/Equipment are all available simultaneously. No more double-booking your X-Ray room or your best pontoon boat.
- 🔒 HIPAA Compliance Suite: Secure your practice with enterprise-grade protection. Our new HIPAA Mode encrypts patient notes at rest, anonymizes data before it syncs to Google Calendar, and maintains a tamper-resistant audit log of every staff interaction.
- 🔄 2-Way Google Sync: Your staff lives in Google Calendar. Client Sync Pro pushes appointments to their phone instantly and blocks off time in WordPress if they add a personal event in Google—all while stripping sensitive patient names to keep you compliant.
- 💳 Dynamic WooCommerce Payments: We don't just "support" WooCommerce; we integrate deeply. Charge different rates for weekends, offer membership discounts, or require deposits. The booking flow feels native and professional.
- 👥 Memberships & Packages: Turn one-off customers into recurring revenue. Sell membership tiers that grant booking credits or exclusive discounts automatically.
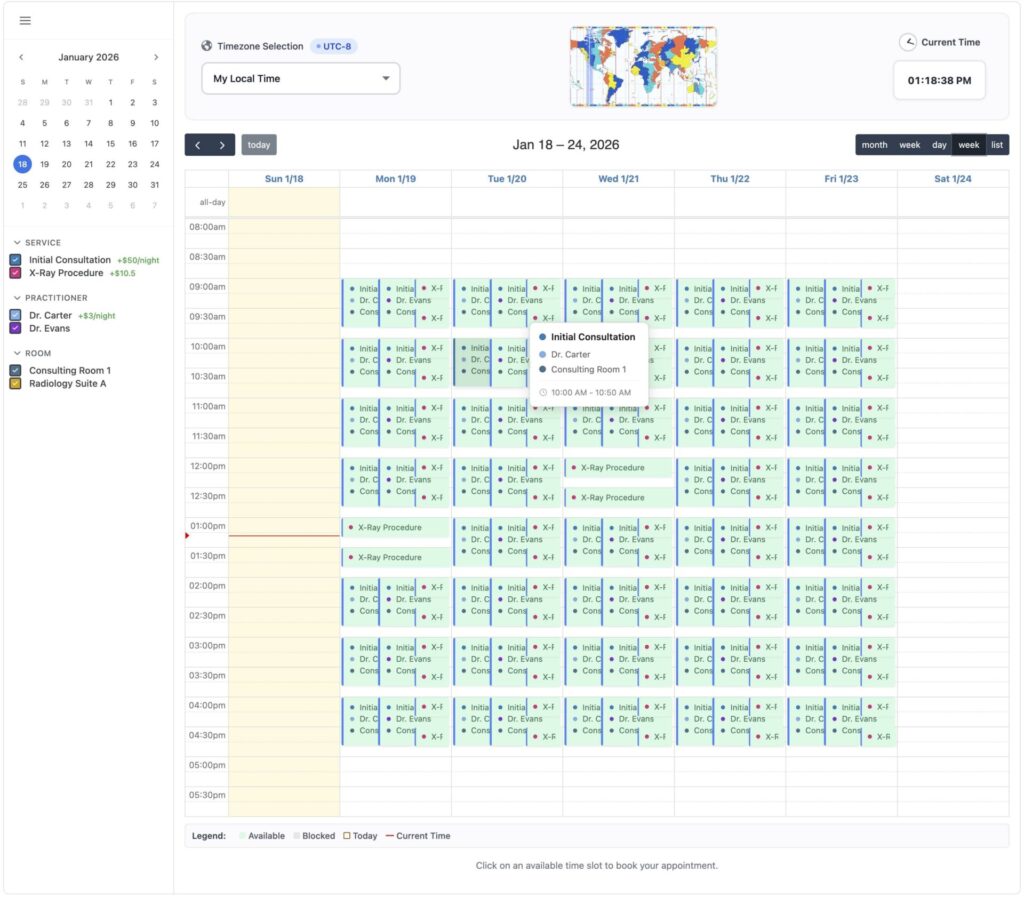
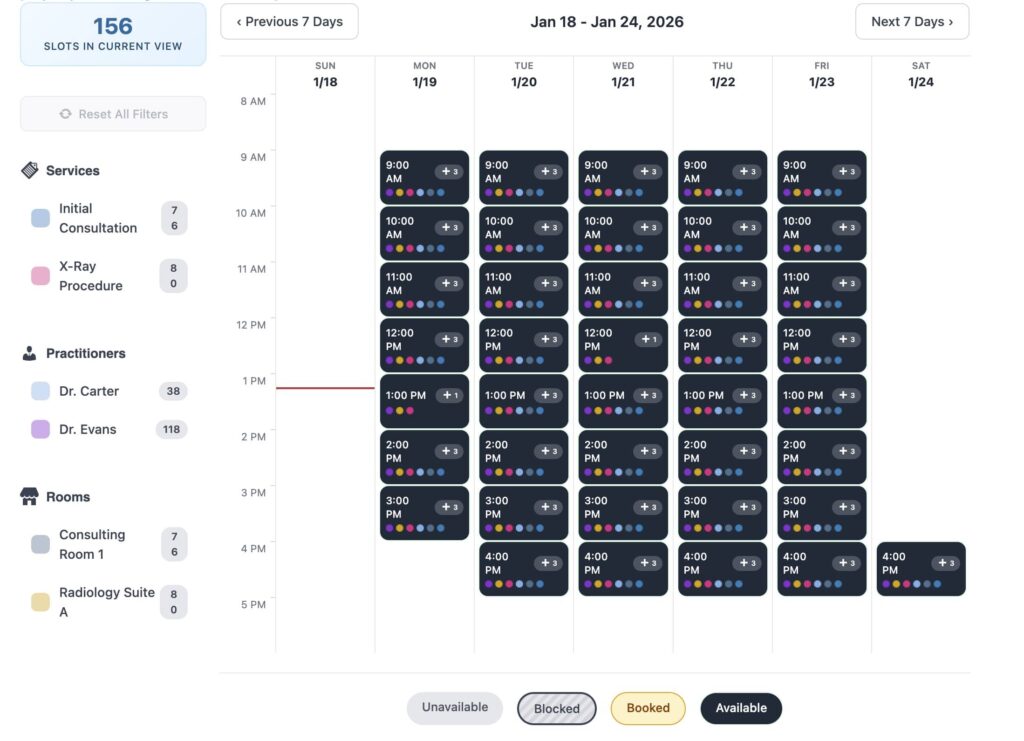
- 📊 Manager Timeline View: See your entire business at a glance. Our "Video Editor style" timeline visualization lets you spot gaps and overlaps across all your resources instantly.
Whether you need simple time slots, multi-day rentals, or a secure medical scheduling platform, Client Sync scales with you without bloating your database.
Upgrade to Client Sync Pro Today
$278.00 USD / Year

Client Sync
Tracking Your Client Appointments, Notes, Billing & Progress
Stop Juggling Multiple Systems. Start Managing Your Entire Client Lifecycle with Client Sync.
The Ultimate WordPress Appointment Plugin for Service Professionals
Tired of slow, clunky booking plugins that can't keep up with your business? Client Sync is a powerful, high-performance WordPress appointment plugin built from the ground up for service-based businesses, clinics, and consultants who demand speed, reliability, and total control.
From the first booking to the final payment, Client Sync provides a single, integrated system to manage client registrations, appointments, payments, and detailed notes—without sacrificing your website's performance.
[Button] Get Client Sync Now | [Link] View Live Demo
Why Choose Client Sync Over Other WordPress Booking Systems?
Other plugins rely on the standard WordPress post table, which slows to a crawl with thousands of appointments. Client Sync is different. We use a custom, optimized database architecture to handle massive appointment volumes, ensuring your booking calendar loads instantly, every time.
-
⚡ Blazing-Fast Performance: Our custom tables ensure your site remains fast and responsive, even with complex schedules and thousands of available slots. No more frustrated clients waiting for a calendar to load.
-
💳 Seamless WooCommerce Integration: Go beyond simple booking. Require deposits, accept full payments, or even set up "Pay on Day" automatic charges for a professional, automated payment workflow.
-
🎨 Unmatched Customization: Create the exact booking experience you need. With unlimited custom fields—including our unique Image Map for visual annotations—and flexible availability rules, Client Sync adapts to your business, not the other way around.
-
🤖 Powerful Automation: Set your availability generation and appointment reminders on autopilot. Reduce no-shows and administrative work so you can focus on what you do best: serving your clients.
(Image/Graphic: A visual comparison showing a fast-loading Client Sync calendar next to a slow, generic one.)
A Complete Feature Set for Professional Client Management
| Feature | Client Sync | Other Plugins |
| High-Performance Custom Tables | ✅ | ❌ |
| Availability Dimensions (Service, Location, etc.) | ✅ | Limited |
| WooCommerce "Pay on Day" Auto-Charge | ✅ | ❌ |
| Image Map Custom Field | ✅ | ❌ |
| Frontend Manager Dashboards | ✅ | Limited |
| Automated Slot & Reminder Cron Jobs | ✅ | ✅ |
| iCal/.ics Export | ✅ | ✅ |
[Button] View All Features
What Our Users Are Saying
"Client Sync transformed how we manage our clinic's bookings. The speed is incredible, and the WooCommerce payment options have streamlined our entire process. A must-have for any serious service business."
– Jane D., Clinic Owner
Ready to Upgrade Your Booking System?
Experience the difference a high-performance WordPress appointment plugin can make. Get started with Client Sync today and give your clients the seamless booking experience they deserve.
Get Client Sync Now - 30-Day Money-Back Guarantee!
Custom Admin CSS WordPress Plugin
Free! Like Speech.
It is so easy and useful that I thought I should pass it on.
This is the code that is in the file. Install this plugin like any other in your WordPress Administrator area.
- Navigate to Settings > Custom Admin CSS in the admin menu.
Features and Security
- Simple Interface: A straightforward textarea for CSS input.
- Admin-Only: The CSS only affects the backend, thanks to the admin_head hook.
- Secure: The wp_strip_all_tags function removes HTML tags from the input, ensuring no malicious code (like <script>) can be executed, while preserving CSS syntax.
- Permission Check: Only users with manage_options capability (typically administrators) can access the settings.
Notes
- The CSS applies globally to all admin pages. For specific pages, you’d need to add conditions using get_current_screen() (beyond this basic version).
- No preview is included, but you can test styles by saving and refreshing an admin page.
This plugin provides a simple, effective way to customize the WordPress admin area’s appearance with your own CSS!
<?php
/*
Plugin Name: Custom Admin CSS
Description: Allows adding custom CSS to the WordPress admin area.
Version: 1.0
Author: Your Name
*/
// Add settings page to the admin menu
function custom_admin_css_add_menu() {
add_options_page(
'Custom Admin CSS', // Page title
'Custom Admin CSS', // Menu title
'manage_options', // Capability required
'custom-admin-css', // Menu slug
'custom_admin_css_settings_page' // Callback function
);
}
add_action('admin_menu', 'custom_admin_css_add_menu');
// Render the settings page
function custom_admin_css_settings_page() {
?>
<div class="wrap">
<h1>Custom Admin CSS</h1>
<form method="post" action="options.php">
<?php
settings_fields('custom_admin_css_options');
do_settings_sections('custom-admin-css');
submit_button();
?>
</form>
</div>
<?php
}
// Register settings with sanitization
function custom_admin_css_register_settings() {
register_setting(
'custom_admin_css_options', // Option group
'custom_admin_css', // Option name
'custom_admin_css_sanitize' // Sanitization callback
);
add_settings_section(
'custom_admin_css_main', // Section ID
'Main Settings', // Section title
'custom_admin_css_section_text', // Callback for description
'custom-admin-css' // Page slug
);
add_settings_field(
'custom_admin_css_textarea', // Field ID
'Custom CSS', // Field title
'custom_admin_css_textarea', // Callback for field
'custom-admin-css', // Page slug
'custom_admin_css_main' // Section ID
);
}
add_action('admin_init', 'custom_admin_css_register_settings');
// Sanitize the CSS input
function custom_admin_css_sanitize($input) {
return wp_strip_all_tags($input); // Removes HTML tags, keeps CSS
}
// Section description
function custom_admin_css_section_text() {
echo '<p>Enter your custom CSS below to style the WordPress admin area:</p>';
}
// Textarea for CSS input
function custom_admin_css_textarea() {
$css = get_option('custom_admin_css', ''); // Load saved CSS or empty string
echo '<textarea name="custom_admin_css" rows="10" cols="50">' . esc_textarea($css) . '</textarea>';
}
// Output CSS in admin head
function custom_admin_css_admin_head() {
$css = get_option('custom_admin_css', '');
if (!empty($css)) {
echo '<style type="text/css">' . wp_strip_all_tags($css) . '</style>';
}
}
add_action('admin_head', 'custom_admin_css_admin_head');
?>
Image Marker
Image Marker for Gravity Forms
Ask about our discount bulk pricing here.
Interactively mark specific points on an image
We've developed a custom Gravity Forms field called Image Marker, designed to enhance form functionality by allowing users to interactively mark specific points on an image directly within a form. This field is perfect for scenarios where visual input is valuable-think marking pain points on a medical diagram, indicating locations on a map, or highlighting areas of interest in a photo. It's built to integrate seamlessly into the Gravity Forms ecosystem, providing an intuitive experience for both form administrators and end-users.
Doctors, for medical notes.
Medical Recording, Interactive Patient Form.
Medical Patient Onboarding Tool
Key Features
Here's what makes the Image Marker field stand out:
- Interactive Marking: Users can click on an image to place marks-visualized as small indicators like red dots-and the coordinates of these marks are captured and stored for processing.
- Mandatory Input Option: Administrators can set the field as "Required," ensuring users add at least one mark before submitting the form. If no marks are added, a validation message prompts the user to engage with the image.
- Customizable Settings: In the Gravity Forms editor, form creators can configure the field by selecting the image, setting canvas dimensions, and applying options like CSS classes or conditional logic for a tailored setup.
- Processed Output: After submission, the marks are scaled to the original image size, drawn onto the image (e.g., as red dots), and saved as a new file linked to the form entry.
- Email Integration: The marked image is automatically included in Gravity Forms' email notifications, so recipients can see the user's input right in their inbox.
- User-Friendly Design: The field blends naturally into Gravity Forms, appearing as a standard field type with its own settings and validation, making it easy to use for everyone involved.
- Real-Time Interaction: Front-end JavaScript powers the interactive experience, capturing clicks on the image and storing coordinates in a hidden input field for submission.
If you are interested in the plugin please get in touch with us.
Screenshots of the back end interface


Use any image you like for your form
We built a new type of form field where you can leave detailed marks. Try clicking on the silhouettes and submit the form.