Archive for August 2026
DM Track Spectator — Follow a Meet
DM Track Spectator lets anyone at a track meet follow along on their phone — live results as races finish, and the announcer’s audio in your pocket. There is no account and nothing to sign up for. You scan a code posted at the track and you are in.
Try it on a sample meet
This page hosts a live join code for a sample meet, so you can see exactly what a spectator sees without waiting for race day.
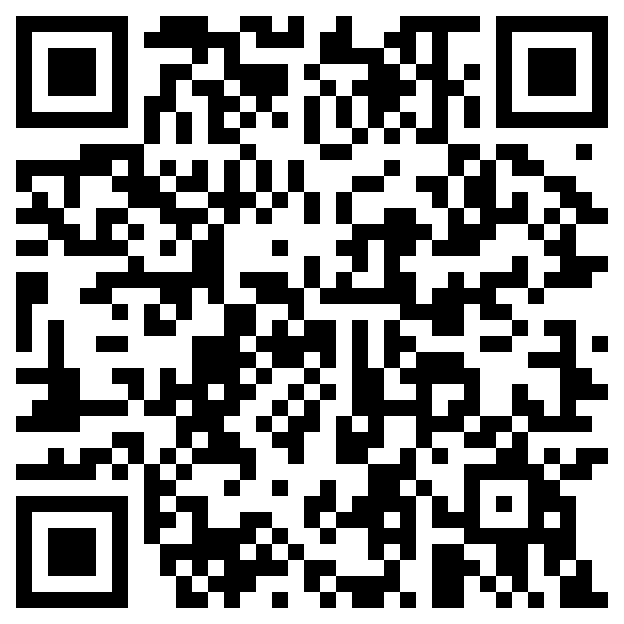
Or open the app and type the code:
MC5UVV2LER
What you will see
- The running order — events and heats for the meet, with the current heat marked.
- Results as they land — finish times by lane, updated from the timing booth as each race is confirmed.
- The announcer — when the booth is broadcasting, a play button gives you the call live. It keeps playing with the phone in your pocket.
How it works at a real meet
The meet organizer prints a sign with the QR code and posts it at the gate or the fence. Spectators scan it with their own phones over their own cellular data — the app never joins the venue’s network or the timing equipment. Each code has an expiry set by the organizer and can be switched off at any time.
Coaches setting up a meet in advance can generate the code ahead of time and put it straight on the invitation, so families arrive already able to follow along.
Privacy
No account, no name, no email address. The camera is used only to read the QR code, and the scan happens on your device. Full details are in the DM Track Privacy Policy.
Meet DM Track Remote — Time a Race with Just Your iPhone
Every race has a moment you wish you’d caught cleanly — who crossed first, and exactly when. Most of the time you’re one person with a stopwatch, watching lane 4 while lanes 6 and 7 finish behind your eyes. DM Track Remote is a track & field timer for iPhone built for exactly that: it hears the gun, runs the clock, records the finish on video, and lets you fix everything afterward against the footage.
Time a race with just your phone
Point the phone at the finish and tap Arm gun. When the starter fires, the clock starts on its own — the phone is listening. Tap the lane numbers as athletes cross. Tap Stop. That’s a timed race, and it needs nothing but the phone in your hand: no other equipment, no network, no account.
Prefer to trigger it yourself? A manual Start button is right there. Want the run-up on tape? Hit Record first and the video rolls before the gun — the app remembers exactly where the start falls inside the footage.
Then true it up against the video
This is the part a stopwatch can never do. Every race is saved with its video and an audio waveform, so you can see the gun as the loudest spike in the clip. Open a finish and the video jumps to that moment. Off by a hair? Nudge it a hundredth at a time, or scrub to the exact frame and set it there.
- Add a finish you missed — scrub to the crossing and drop it in; it sorts into its real place.
- Fix the start — find the gun in the waveform and re-zero every time at once.
- Shoot at up to 240 fps — that’s about 4 milliseconds per frame, roughly eight times finer than ordinary 30 fps video.
Built to grow with your program
The Solo Timer is the front door. The same app is one device in a larger DM Track system — several camera phones, an iPad running DM Track Timer or a Mac coordinating the meet, an Apple TV scoreboard, live results, and video review across angles. Start with one phone at practice; add pieces when a full meet asks for them. Team and meet data can sync privately across your own devices when you choose to turn it on.
Private by default
Solo Timer recordings and times stay on your phone. Nothing is uploaded, there are no ads and no trackers, and cloud sync is opt-in and off until a coach deliberately enables it. You can read the full DM Track Privacy Policy for the details.
Coming to the App Store
DM Track Remote is heading to TestFlight and the App Store now, alongside DM Track Timer for iPad and the Mac control-room app, DM Track Booth. If you coach or officiate and want early access, get in touch at [email protected]. Setup questions are answered on the support page.
DM Track — Support
Support for the DM Track apps: DM Track Timer (iPad), DM Track Remote (iPhone), and DM Track Booth (Mac). If you don’t find your answer here, email [email protected] and a human will reply.
Quick start on iPhone — time your first race
- Open the app and tap Solo Timer.
- Allow camera and microphone access. The camera records the finish; the microphone listens for the gun.
- Point the phone at the finish line.
- Tap Arm gun, then fire the starter (a loud clap works for testing). The clock starts on its own. Or tap Start to begin manually.
- Tap the lane numbers as athletes cross.
- Tap Stop, name the race, and save.
You need nothing else — no other devices, no network, no account.
Quick start on iPad — run a meet
- Open DM Track Timer and dismiss the welcome sheet.
- Open the sidebar with the button in the top-left corner.
- Tap New Meet and pick a template — for example High School (JV / Varsity). This builds the whole event list, split by division and gender.
- Tap Roster to add athletes. To add a lot at once, use the sidebar gear → Import Roster and paste one athlete per line as
First Last (Team). - Open a division to reach its heat, and put athletes in lanes. Heats can also be seeded from past marks.
- Tap Time This Heat, start the race, and tap lane buttons as athletes cross.
Everything above works on one iPad with no network connection and no account. Cameras, iPhones, an Apple TV scoreboard, and a Mac are all optional additions.
Which app do I want?
- DM Track Timer (iPad) — run and score a whole meet: schedule, roster, heats, timing, results, scoreboard.
- DM Track Remote (iPhone) — time a single race by yourself with Solo Timer, or act as a camera angle at a bigger meet.
- DM Track Booth (Mac) — the control room: multi-camera switching, graphics, replay, and broadcast.
Fixing times after the race
Open a saved race from Races or the Recent list. The video plays back with an audio waveform underneath — the starting gun is usually the tallest spike in that waveform.
- Adjust a time: tap the finish in the list. The video jumps to that moment and the controls open. Use Set here to snap it to the current frame, or the −0.10 / −0.01 / +0.01 / +0.10 buttons to nudge.
- Add a finish you missed: scrub to the crossing and tap Add finish at playhead, then pick the lane. It sorts into its correct place automatically.
- Fix the start: find the gun in the waveform, scrub to it, and tap Gun was here. Every finish time shifts together.
- Change a lane: tap the finish, then pick the lane number in the controls.
- Delete a mis-tap: swipe left on the finish.
Frequently asked
The gun isn’t starting the clock
Make sure you tapped Arm gun first — the meter moves whenever the app is open, but a detected sound only starts a race when armed. Watch the level meter while someone claps: if the bar barely moves, lower the sensitivity threshold; if it triggers on crowd noise, raise it. On a windy day, manual Start is more reliable than any microphone.
How accurate is it?
As accurate as your frame rate. One frame at 30 fps is about 33 milliseconds; at 240 fps it is about 4. Set the frame rate on the Solo Timer screen — the app shows what one frame is worth as you change it. Higher frame rates use more storage and may reduce the capture resolution on some devices.
Where are my recordings?
Inside the app, under Races. They are stored privately in the app, not in your Photos library. When the app’s storage allowance fills, it removes the oldest video clips first — recorded times are always kept, even after a clip is cleared.
Do I need an internet connection?
No. The Solo Timer works completely offline. Network features (running a meet across several devices, or Cloud Sync) are optional.
The camera preview is black
Check that camera access is allowed in Settings → DM Track Remote. If you were recording when the phone locked or you switched apps, reopen the Solo Timer screen to restart the camera.
Can I use several phones and a Mac together?
Yes. DM Track Remote is also one device in a larger system — several camera phones, an iPad running DM Track Timer or a Mac coordinating the meet, an Apple TV scoreboard, and video review across angles. The devices find each other over your local Wi‑Fi, so allow Local Network access when asked.
Privacy
Solo Timer recordings and race times stay on your device. There are no ads and no trackers, and Cloud Sync is off until a coach turns it on. Full details are in the DM Track Privacy Policy.
Contact
Bug reports, feature requests, and questions: [email protected]. Telling us your device model, iOS version, and what you were doing helps enormously.
DM Track Timer — Run the Whole Meet from One iPad
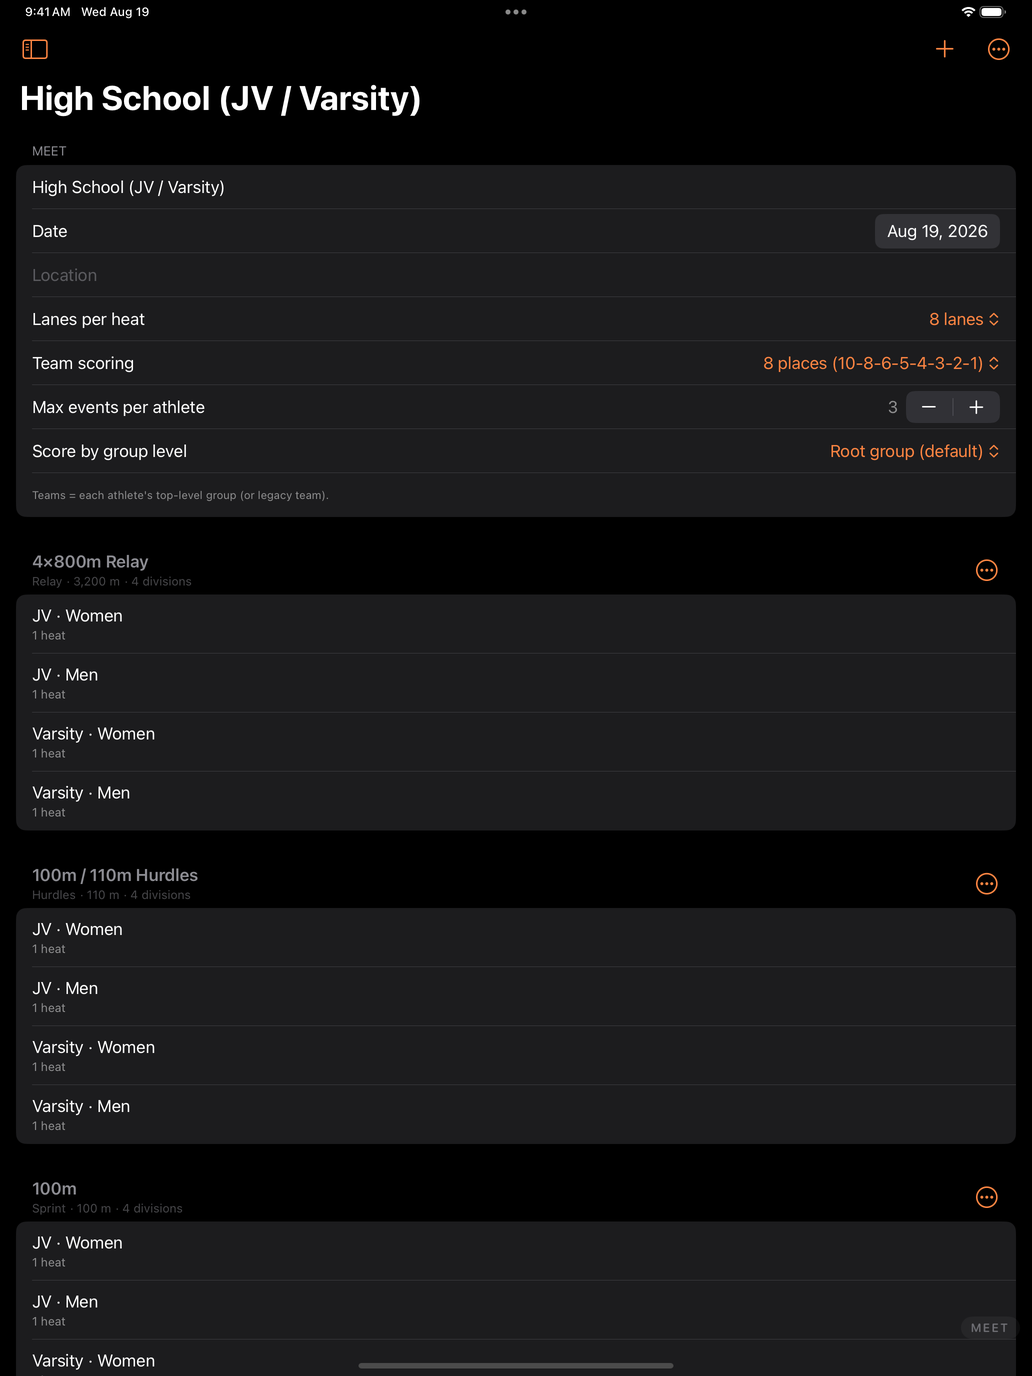
A track meet is a scheduling problem wearing a stopwatch. Eleven events, four divisions each, eight lanes at a time, and a clipboard that has to survive the whole afternoon. DM Track Timer puts the entire scoring table on one iPad — the schedule, the roster, the heats, the timing, and the results — and it works start to finish with no network connection and no account.
Start with a real schedule, not a blank page
Create a meet from a built-in template — High School (JV / Varsity), Middle School with divisions, or sprints and relays for a practice meet. Each one builds the full event list, split by division and gender, with a heat under every division. You are editing a meet within seconds instead of typing one out.
Build the roster once, use it all season
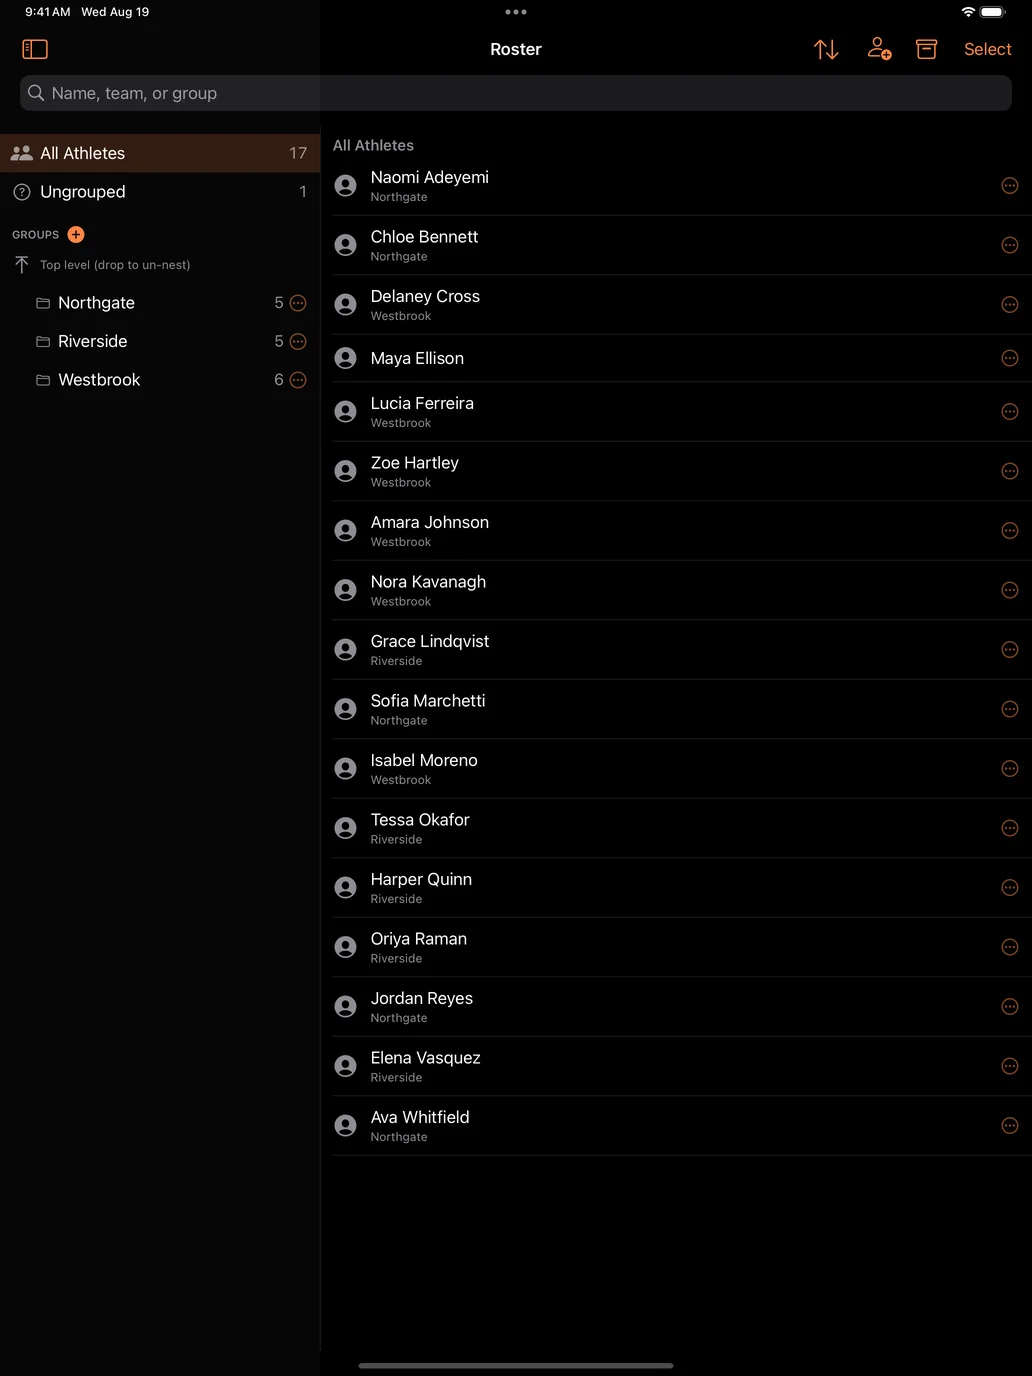
Athletes live in teams and groups that carry across the season. Paste a whole roster in at once, assign event entries, mark who is out and why, and reuse the same list meet after meet. Heats can seed themselves from past marks, so lanes are filled sensibly instead of by hand at the scoring table.
Time every race
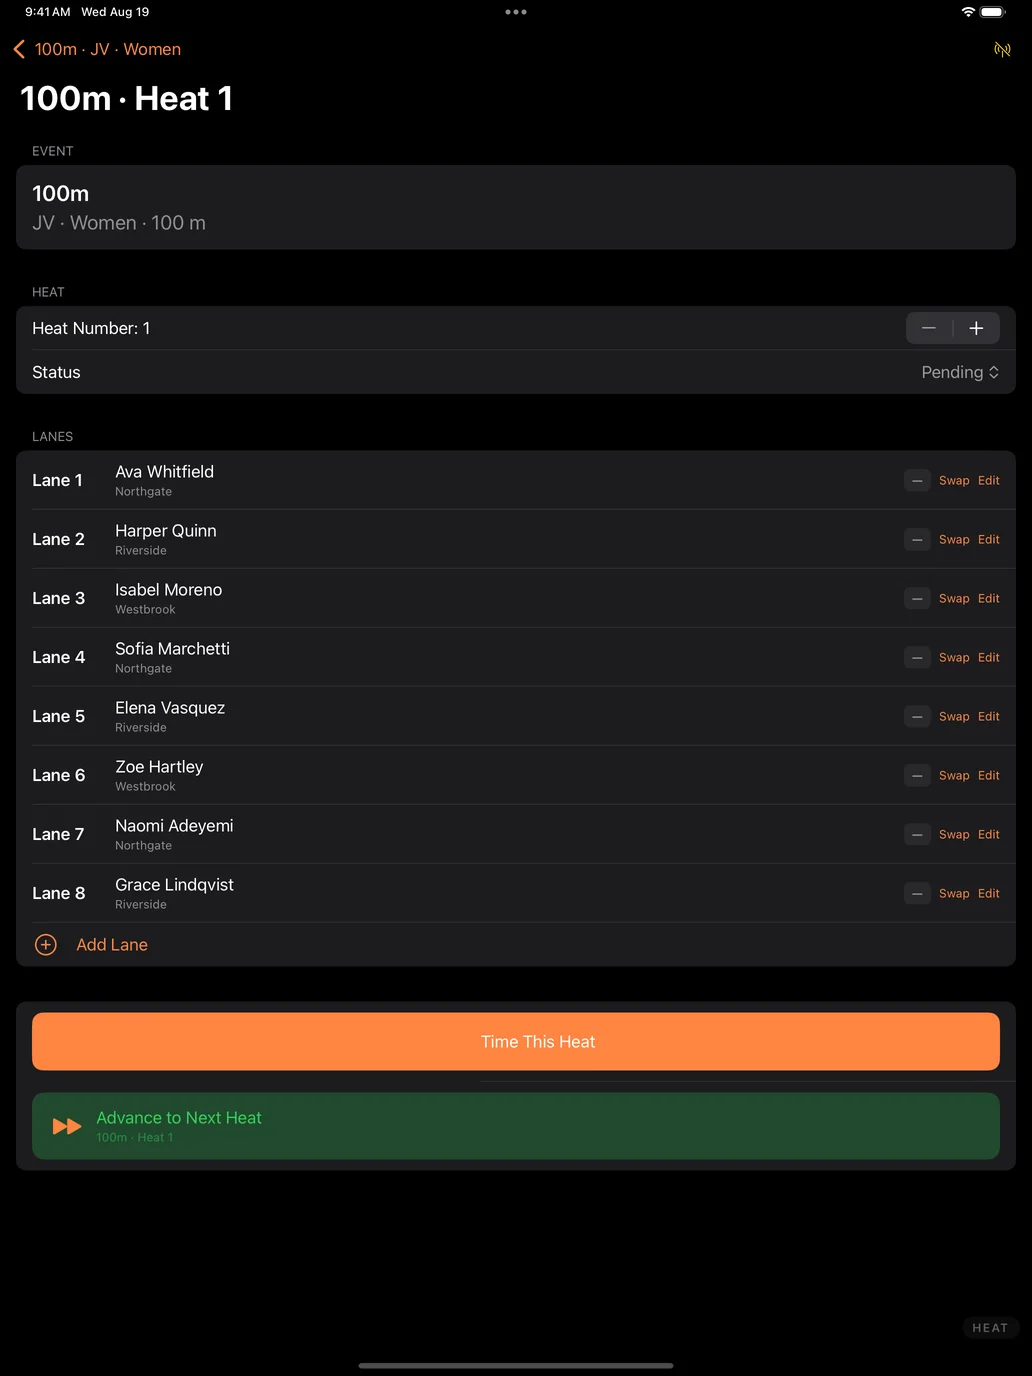
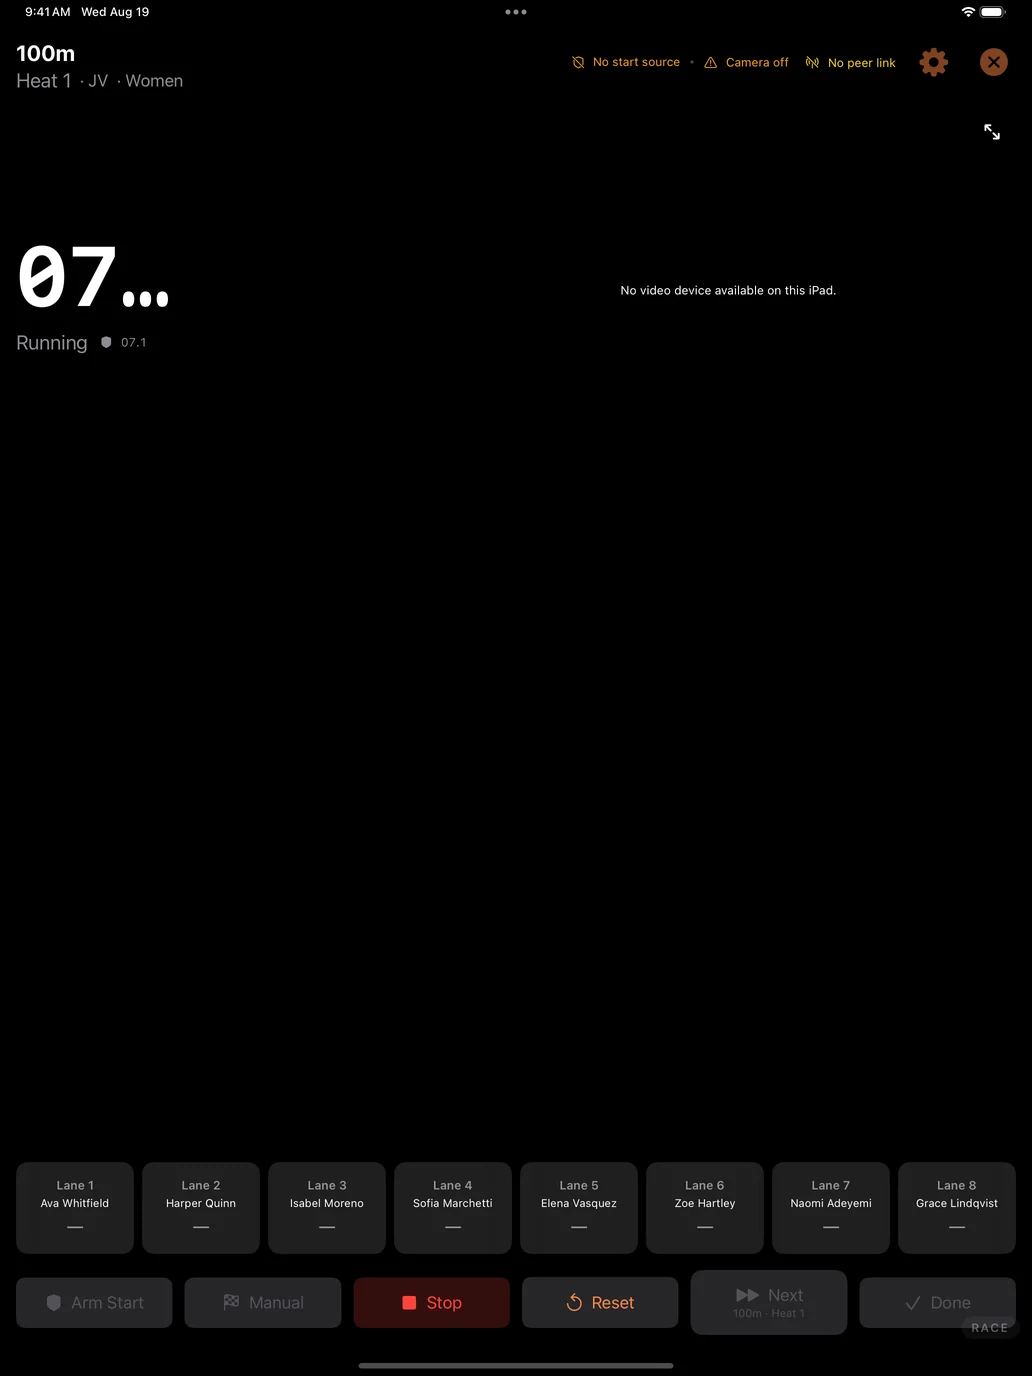
Arm the race, start on the gun, and tap lanes as athletes cross. Point the iPad’s camera at the finish line and it can detect the crossings for you. Camera and detection are set at the meet level, so you calibrate once at the start of the afternoon and every heat after that inherits it — there is nothing to redo between races.
Results and team scoring keep themselves current
Places, times, and team points update as heats finish, with configurable scoring depth. Field events are supported with proper tie handling. Standings are always up to date, so nobody is waiting on a spreadsheet to find out where the meet stands.
Put it on the big screen
Send live results and heat information to an Apple TV so athletes, coaches, and parents can follow along between races — the meet stops being a rumour in the bleachers.
Add cameras when you want them
Bring in iPhones running DM Track Remote as extra camera angles for finish-line video and review. Add a Mac to run a full broadcast with graphics and replays. Start with just the iPad and add pieces only when a bigger meet asks for them.
Private by default
Meet and roster data stays on your iPad. There are no ads and no trackers, and cloud sync — for sharing a team’s data across your own devices — is opt-in and off until you turn it on. The full DM Track Privacy Policy has the details, including how athlete records are handled for schools.
Video belongs to the meet, and the meet belongs to the school
Cameras at a track meet record everyone in the race, not just one athlete. A finish-line clip of your daughter also contains five other people’s children. We think that fact should decide how the video is handled, so it does.
Recording is authorised by the host school, not assumed from the crowd. The school or organisation running the meet decides whether cameras are used, what is kept afterwards, and whether race video may ever be offered to families. It is the same basis schools already use for team photographs, yearbook coverage, and streamed games — and the same basis every sports-video company works on. We are not in the business of asking one parent for permission to film another parent’s child.
What that means in practice:
- The school sets the terms. No cameras, cameras for timing only, or cameras plus video families can see — their call, meet by meet.
- Nothing from the crowd reaches a screen on its own. Any message or video a spectator submits waits for a meet official to approve it. There is no path from a stranger’s phone to the venue screen that skips a person.
- Your own cameras are directed from the booth. During a race the booth can cut between the meet’s cameras and post replays hands-free, so one person can run a whole afternoon. That automation covers the school’s own cameras, pointed where the school pointed them — and it can be switched off entirely, so that nothing reaches the screen until an official approves each shot.
- The footage stays the school’s. We do not sell meet video to third parties, license it for advertising, or use it to train anything.
- If race video is ever offered to families, the school agrees to it first — and shares in it. A meet’s video is the school’s asset, not ours.
Athletic directors are welcome to ask for this in writing before a single camera is set up. We would rather have that conversation early than explain ourselves afterwards.
Coming to the App Store
DM Track Timer for iPad is heading to TestFlight and the App Store, alongside DM Track Remote for iPhone and the Mac control-room app, DM Track Booth. If you coach or officiate and want early access, get in touch at [email protected]. Setup questions are answered on the support page.
DM Track Privacy Policy
Last updated: August 31, 2026
DM Track is made by Dependent Media. It is software for timing and recording track & field meets. This policy explains what the apps store, what leaves your device, and what we can see. It covers DM Track on iPhone, iPad, Mac, and Apple TV, and the DM Track Spectator app for people attending a meet.
We do not sell your data. We do not use advertising or analytics SDKs, and we do not track you across other apps or websites.
The short version
DM Track handles data in three separate tiers. Which ones apply depends entirely on how you use it.
| Tier | What happens | Can Dependent Media see it? |
|---|---|---|
| On your device | Solo Timer recordings, race times, app settings | No |
| On your local network | Devices at a meet share video and results directly with each other | No |
| Cloud Sync (opt-in, off by default) | Team and meet data syncs to our server | Yes |
If you only use the app to time races on one device, nothing leaves that device and we never receive any of it.
1. Data stored only on your device
The Solo Timer records video and race times to the app’s private storage — video and audio from your camera and microphone, the race clock, and the finish times you record. This data stays on your device. It is not uploaded to us. Deleting a race in the app, or deleting the app, removes it.
2. Data shared on your local network
When you run a meet with more than one device (phones, an iPad, a Mac, an Apple TV), those devices talk directly to each other over your local Wi-Fi. They exchange camera video, race timing, results, and roster information for the meet in progress. This traffic goes between your own devices. It does not pass through our servers and we cannot see it.
3. Data stored on our servers (Cloud Sync)
Cloud Sync is off by default. If a coach or administrator turns it on, the following is stored on our server (sync.dependentmedia.com) so it can be shared between that team’s own devices and people:
- Team/organization name and settings
- Meets and events — schedules, heats, results, and recorded marks
- Athlete records — first and last name, display name, bib number, team, group, event entries, availability, and performance marks
- Athlete photos, where a coach has added them
- Coach notes and feedback about an athlete
- Account information for coaches and staff — email address, and the sign-in tokens used to log in
- Device records — an identifier, device type, and name for each of your devices that connects, so they can be paired and kept in sync
- Venue and camera positions — coordinates for where cameras were placed, used to show camera locations on a venue map
- Basic operational logs needed to run the service
Who can see it
- Coaches and staff you invite to your organization can see your organization’s data.
- Athletes given a read-only login can see only their own record — their events, marks, availability, and any feedback a coach has explicitly chosen to share. Coach-private notes are never shown to athletes.
- Dependent Media can access data on the server only as needed to operate, back up, secure, and support the service.
4. Athletes and minors
DM Track is used by schools, and the athletes in it are often minors. Athlete records are created and controlled by the coach, school, or organization using the app — not by the athletes themselves. That organization decides what is entered, who is invited, and what is shared. We act on their behalf as a service provider and do not use athlete information for any purpose other than providing the service.
We do not knowingly allow athlete records to be used for advertising, profiling, or any commercial purpose. If you are a parent or guardian and want an athlete’s information corrected or removed, contact the coach or school that runs the account, or contact us and we will assist them.
5. Device permissions
| Permission | Why |
|---|---|
| Camera | Recording races and finishes; live camera feeds during a meet |
| Microphone | Detecting the starting gun, and audio on recordings |
| Local Network | Finding your other DM Track devices at a meet |
| Location (optional) | Recording where a camera is placed at a venue |
| Photos (optional) | Adding an athlete photo you choose |
Declining any of these limits the related feature but does not prevent the app from running. Solo Timer needs only camera and microphone.
6. Retention and deletion
- On-device data stays until you delete it. The app automatically removes its oldest video recordings when its storage allowance fills; race times are kept.
- Cloud Sync data is kept while the organization’s account is active. A coach or administrator can delete athletes, meets, or the entire organization. You can also email us to request deletion of an account and its data.
7. Security
Connections to our server use HTTPS. Passwords and sign-in tokens are stored hashed, never in plain text. Access to an organization’s data requires a valid session for that organization. No system is perfectly secure, but we take reasonable measures to protect this information and we act promptly on any issue we discover.
8. Children’s privacy and schools
We do not offer DM Track directly to children. Accounts are created by coaches, schools, or organizations, who are responsible for obtaining any consent required by their institution or by law before entering an athlete’s information.
9. DM Track Spectator
DM Track Spectator is a separate free app for people attending a meet — parents, athletes, and fans. It is a viewer: it shows results and plays the announcer’s audio. It does not time races or record video.
There is no account and no sign-in. You join a meet by scanning the QR code posted at the track, or by typing the short code printed under it. We never ask for your name, email address, or phone number, and there is nothing to create or remember.
When you join, the app generates a random identifier for your device and exchanges the join code for a viewing pass. Our server stores that pass, the random device identifier, which meet it is for, and when it was created and last used. That record is not linked to you as a person — it identifies a device holding a pass, nothing more.
The camera is used only to read the QR code. The scan happens on your device. No photo is taken, stored, or sent to us. If you type the code instead, the app never asks for camera access at all.
Every join code has an expiry date set by the meet organizer, and can be switched off by them at any time. When a code expires or is revoked, the passes issued from it stop working. Deleting the app removes the pass and the random identifier from your device.
DM Track Spectator does not use your location, does not upload anything from your phone, and contains no advertising or analytics SDKs.
10. Changes to this policy
If we change this policy we will update the date at the top and, for significant changes, notify account holders by email.
11. Contact
Questions, corrections, or deletion requests: Dependent Media — [email protected]
Record the Call, Read It Back — DM Record & Transcribe for Mac
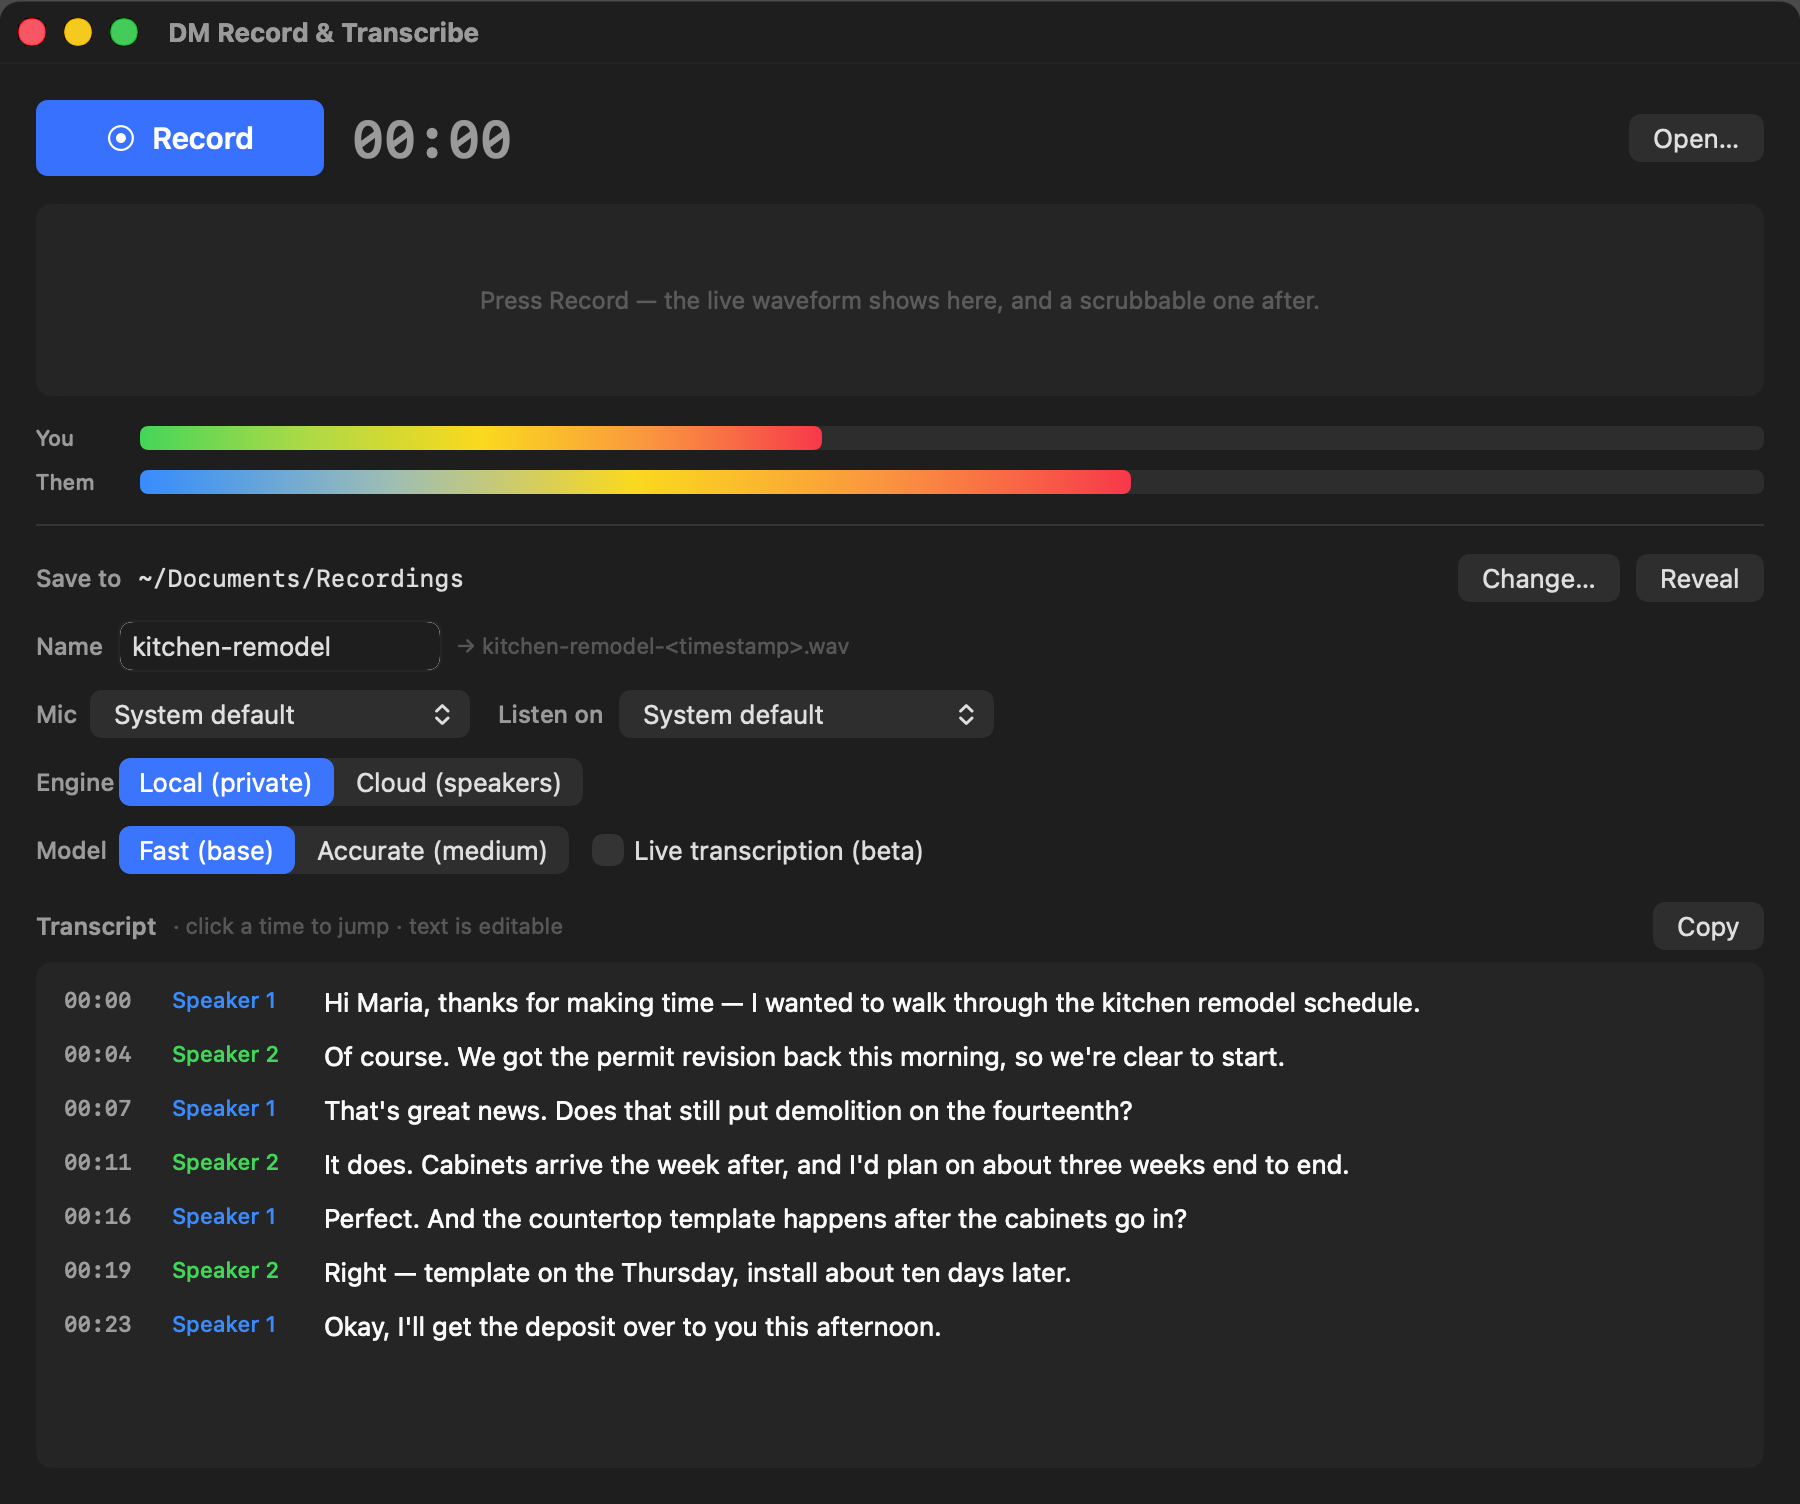
Every important call has a moment you wish you’d written down. The price they quoted. The date they promised. The exact wording of the thing everyone later remembers differently. DM Record & Transcribe is a native Mac app built for those moments: press Record, have your call, and get back a readable transcript — with each side of the conversation labeled — without your audio ever leaving your Mac.
One click, both sides, no plumbing
Recording a call on a Mac used to mean virtual audio drivers, reboots, and rearranged sound settings. DM Record & Transcribe uses macOS’s modern system-audio capture instead: click Record, approve one permission the first time, and the app captures your microphone and the other side of the call — Google Voice, Zoom, Meet, FaceTime, anything you can hear — while you keep hearing everything exactly as normal. Nothing to install, nothing to undo afterward.
Transcripts that read like a script
When you stop, the built-in Whisper engine — running entirely on your Mac — turns the recording into a time-synced transcript. Click any line to jump the playback there; edit any line in place. Because the app records you and the other side as separate channels, Pro can label every line You: or Them: with an accuracy cloud services can’t match, since it never has to guess who’s speaking.
Every recording in one window
Version 3.0.2 adds a Recordings window (Window › Recordings, or ⌘L): every recording in your save folder, newest first, with its date, length and transcript. Search names and everything that was said, and the matches are marked in the transcript. Play a recording straight from the list, transcribe any that doesn’t have a transcript yet — or all of them at once — and export a transcript as plain text, subtitles (.srt) or web captions (.vtt). Rename a recording or move it to the Trash and its transcript files go with it.
Private by architecture
No account. No cloud. Your recordings are ordinary files in a folder you choose, and transcription happens on your machine. (An optional bring-your-own-key cloud engine is there if you want diarized transcripts of multi-speaker meetings — your key, your call, literally.)
Fair pricing, familiar promise
Recording and on-device transcription are free. Pro — speaker-labeled scripts, live transcription while you talk, and the cloud engine — is a one-time $19.99. Like everything we ship: not a subscription.
DM Record & Transcribe is on the Mac App Store now. It needs macOS 14.4 or later. Get it on the Mac App Store. Have a workflow it should fit? Tell us — we’re not shy about shipping fixes fast.
Describe It, Get a Flowchart — DM Flowchart Designer for Mac & iPad
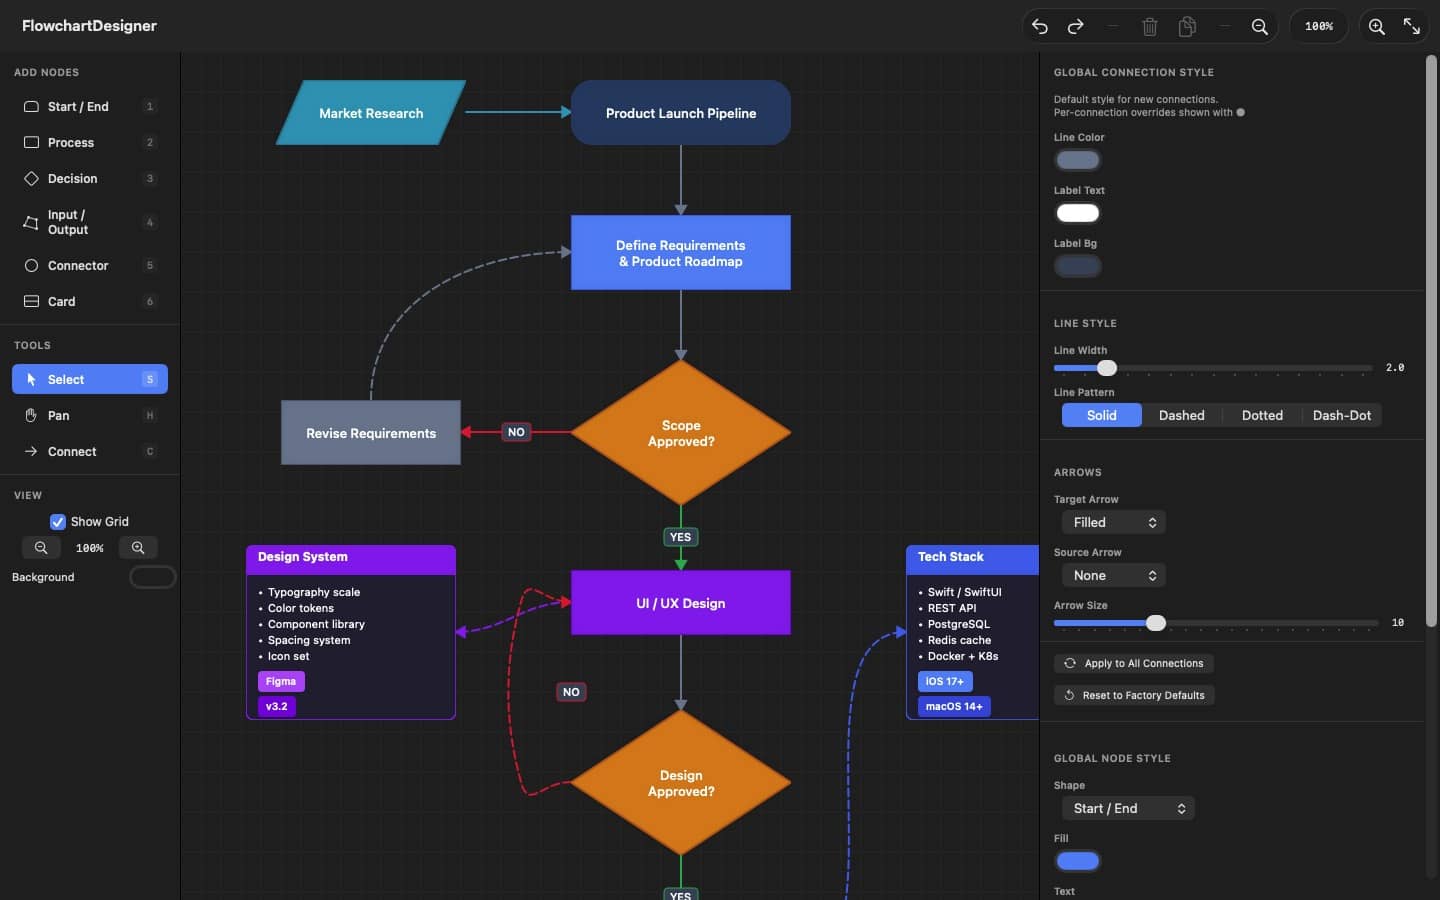
Some ideas only make sense once you can see them. A process with a decision in the middle. A support flow with three escalation paths. The way your CI pipeline actually works, as opposed to the way everyone assumes it works. DM Flowchart Designer is a native app for Mac and iPad built for exactly those moments — and if drawing boxes isn’t your thing, you can just describe the diagram in plain language and let the built-in AI assistant draw it for you.
Describe it, get a flowchart
Type “an onboarding flow for a new hire, with an IT-equipment branch and a manager sign-off at the end” and a complete, styled, connected flowchart appears on the canvas — ready to edit like you’d made it yourself. The AI assistant is bring-your-own-key: plug in your own Anthropic, OpenAI, Google, or xAI API key, stored safely in your Keychain and sent only to the provider you chose. No subscription to us for the privilege.
A real editor, not a toy
Seven node shapes with number-key shortcuts, an infinite canvas with a minimap, smart connection routing that walks around obstacles, gradients, patterns, per-shape global styles, card nodes with badges, image and PDF import that keeps vector data, grouping, layers, and fifty levels of undo. Keyboard-first on the Mac, touch-friendly on iPad, and your files are plain local documents — no account, no cloud, nothing leaves your machine.
Start from a template
Eight built-in templates — basic flowcharts, decision trees, troubleshooting guides, CI/CD pipelines, hiring processes, and more — give you a polished starting point instead of a blank page.
Free to use, fair to upgrade
The free version is a complete flowchart editor with PNG export. A one-time $9.99 Pro purchase — not a subscription — adds AI generation, PDF & SVG export, multiple tabs, and every template.
Want the full tour? The complete User Guide is on the web (and built into the app), with a printable PDF manual. Or see the product page for screenshots and the feature rundown.
DM Flowchart Designer — User Guide
DM Flowchart Designer — User Guide
Everything in DM Flowchart Designer, explained — the same guide that's built into the app, for Mac and iPad. On the Mac you'll find it under Help → User Guide; on iPad it's under Menu → User Guide.
Download on the App Store · Download the manual (PDF) · About DM Flowchart Designer
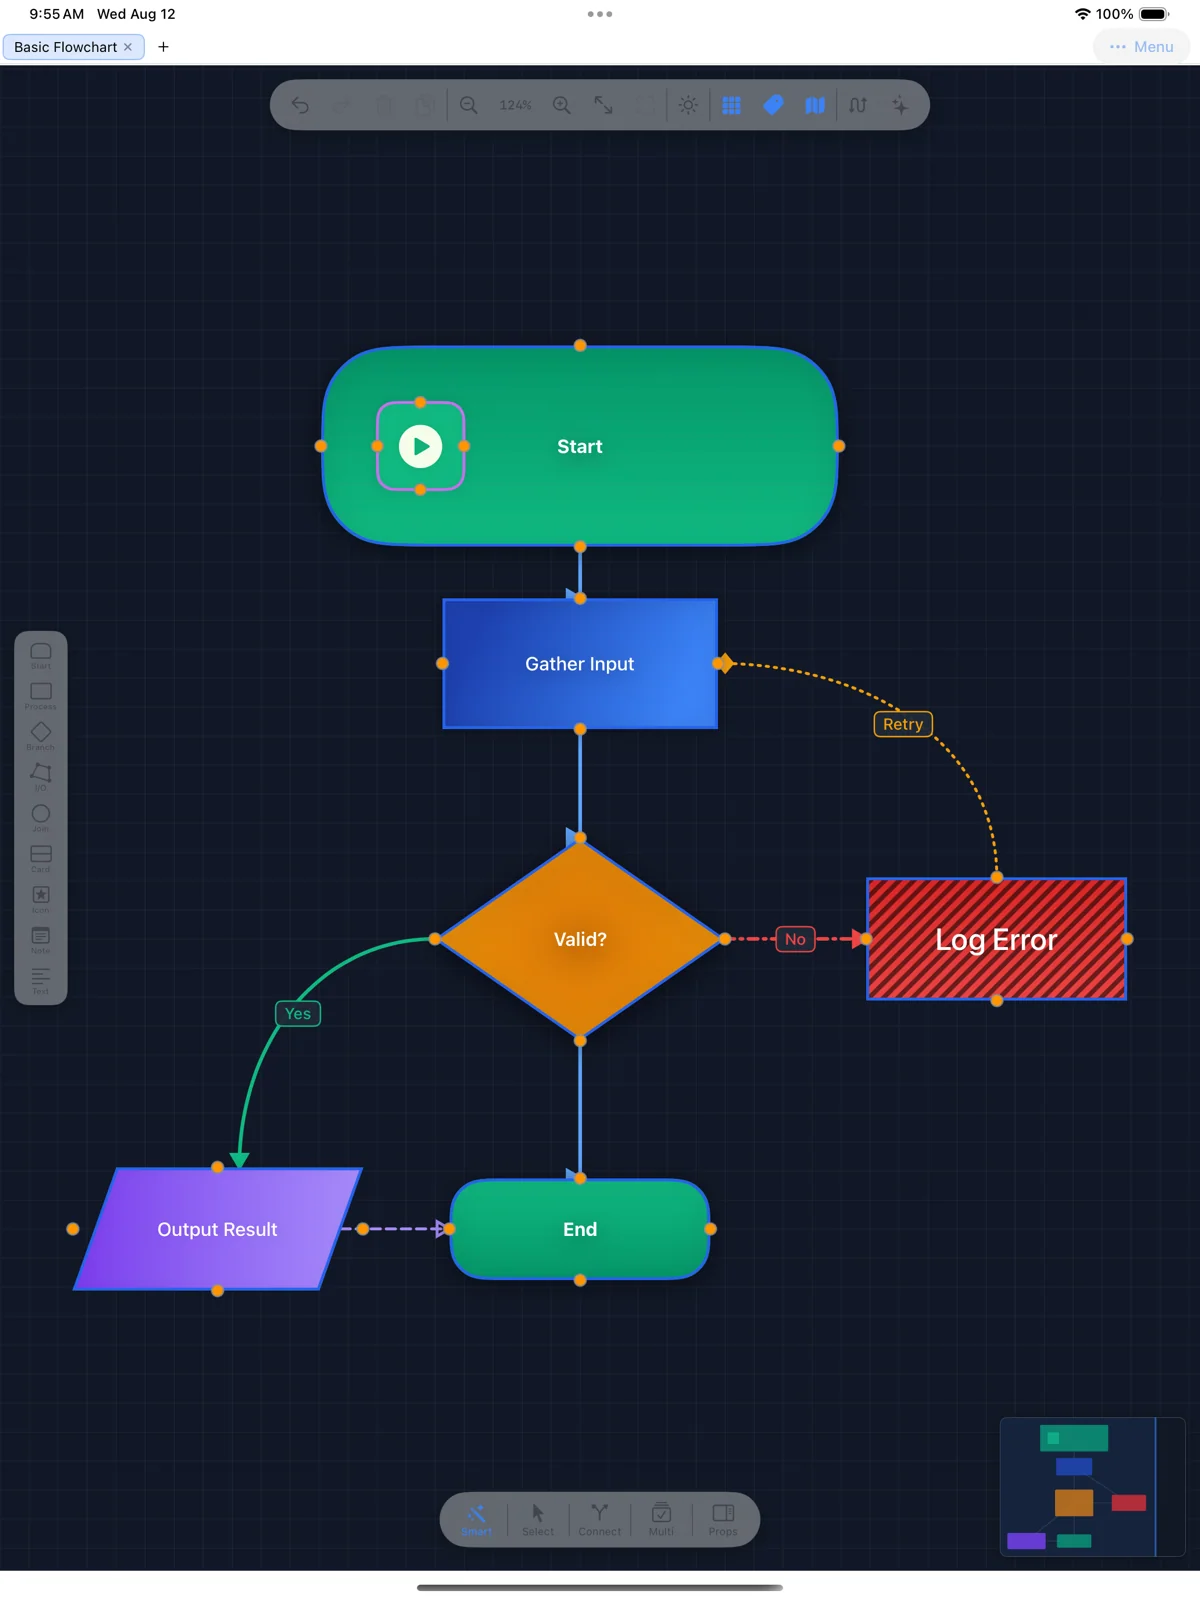
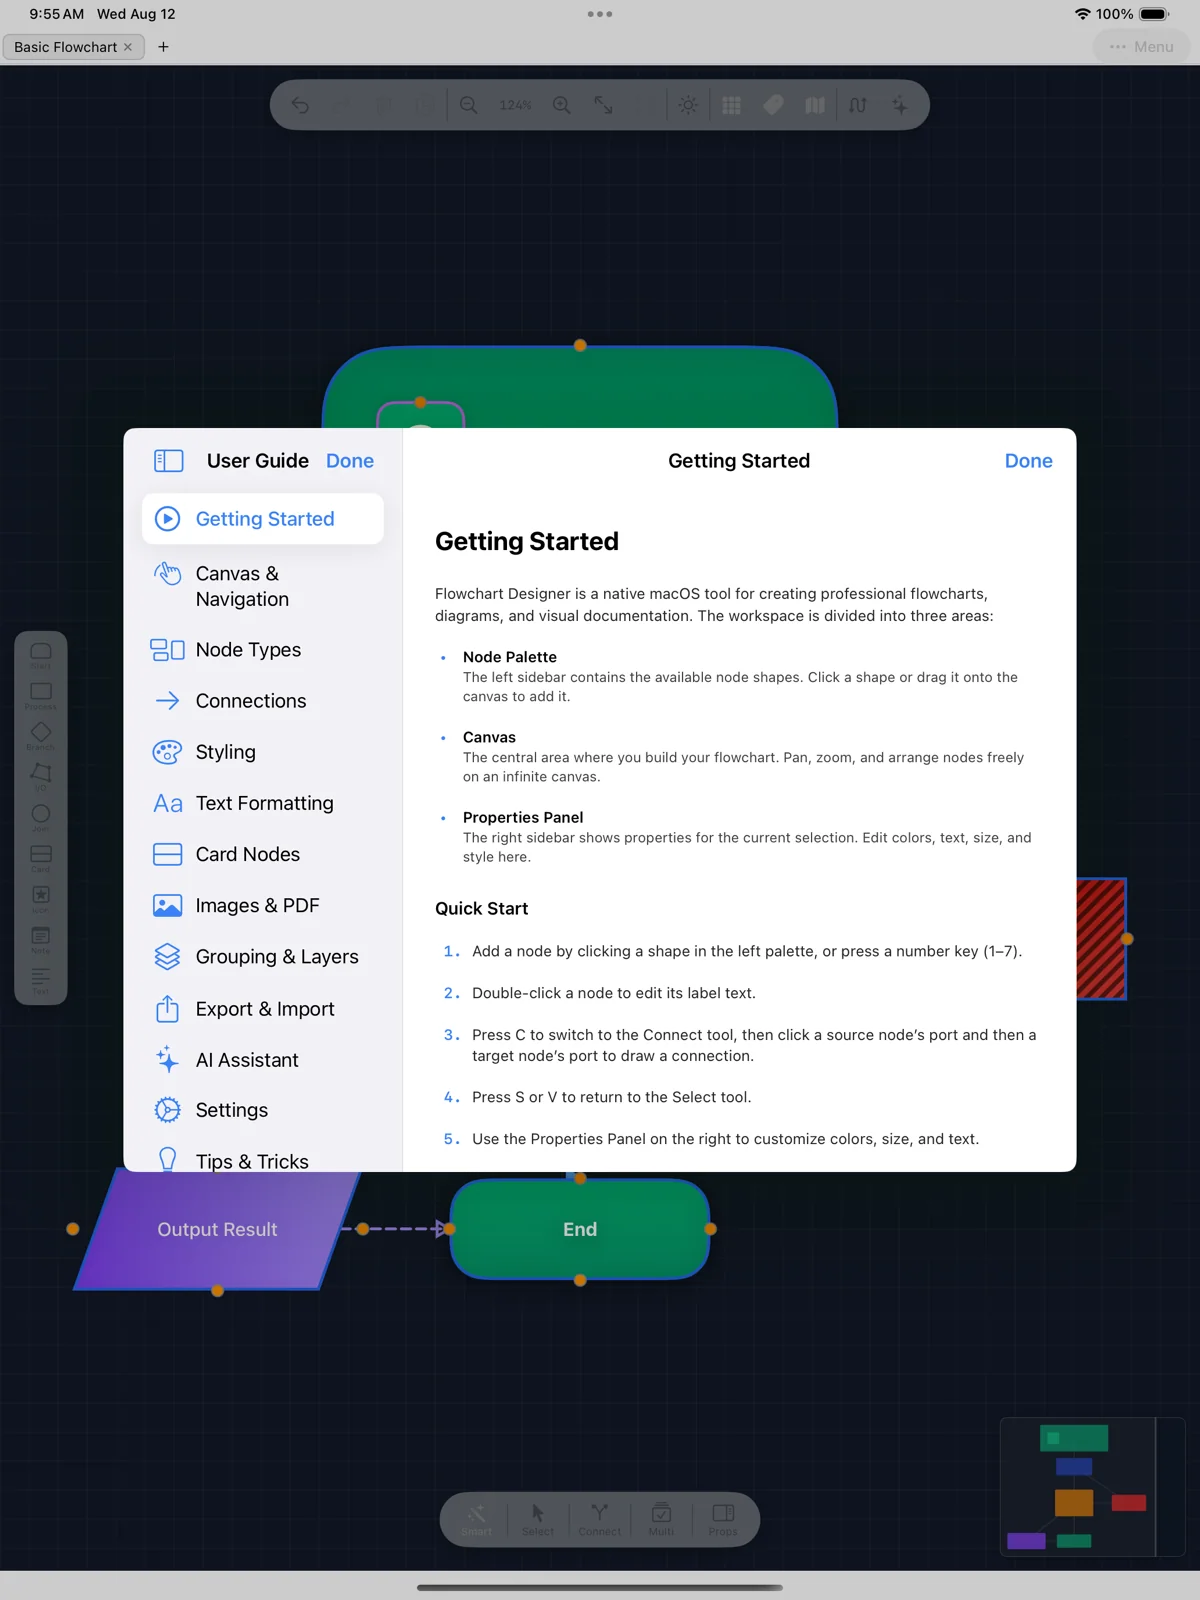
This guide is built into the app — shown here on iPad (Menu → User Guide).
Getting Started
Flowchart Designer is a native macOS tool for creating professional flowcharts, diagrams, and visual documentation. The workspace is divided into three areas:
- Node Palette — The left sidebar contains the available node shapes. Click a shape or drag it onto the canvas to add it.
- Canvas — The central area where you build your flowchart. Pan, zoom, and arrange nodes freely on an infinite canvas.
- Properties Panel — The right sidebar shows properties for the current selection. Edit colors, text, size, and style here.
Quick Start
- Add a node by clicking a shape in the left palette, or press a number key (1–7).
- Double-click a node to edit its label text.
- Press
Cto switch to the Connect tool, then click a source node's port and then a target node's port to draw a connection. - Press
SorVto return to the Select tool. - Use the Properties Panel on the right to customize colors, size, and text.
- Save your work with
⌘Sor export as PNG, PDF, or SVG.
Tools
Select (S / V)— Click to select nodes and connections. Drag to move. Shift-click for multi-select. Drag on empty canvas to marquee-select.Connect (C)— Click a source port, then click a target port to draw a connection arrow between two nodes.Pan (H)— Click and drag to pan the canvas. You can also hold Space temporarily in any tool to pan.
The workspace on Mac: node palette (left), infinite canvas (center), properties panel (right).
Canvas & Navigation
The canvas is an infinite workspace. Use these controls to navigate:
Zooming
⌘ +/⌘ –— Zoom in and out from the menu or keyboard.- Pinch gesture — Pinch on a trackpad to zoom centered on the gesture.
⌘+ Scroll wheel — Scroll while holding Command to zoom at the cursor position.- Zoom controls — Use the +/– buttons and percentage display in the toolbar.
⌘ 0— Reset to actual size (100% zoom, centered).⌘ ⇧ 0orF— Fit all nodes into the visible viewport.
Panning
- Two-finger scroll — Scroll on a trackpad to pan the canvas.
Hkey — Switch to the Pan tool and drag to pan.- Space (hold) — Hold Space in any tool to temporarily pan; release to return to your previous tool.
- Middle mouse drag — Click and drag with the middle mouse button to pan.
Selection
- Click — Click a node or connection to select it.
- Shift + Click — Add or remove a node from the current selection.
- Marquee — Click and drag on an empty area to draw a selection rectangle.
⌘ A— Select all nodes on the canvas.- Escape — Deselect all and cancel any pending operation.
Grid
A dot grid is shown by default to help with alignment. Toggle it from the toolbar or in Settings → General. The canvas background color can also be customized.
Minimap
A minimap overlay appears in the bottom-right corner of the canvas, showing a bird's-eye view of your entire flowchart. The blue rectangle indicates the currently visible viewport.
M— Press M to toggle the minimap on or off.- Toolbar — Click the map icon in the toolbar to toggle the minimap.
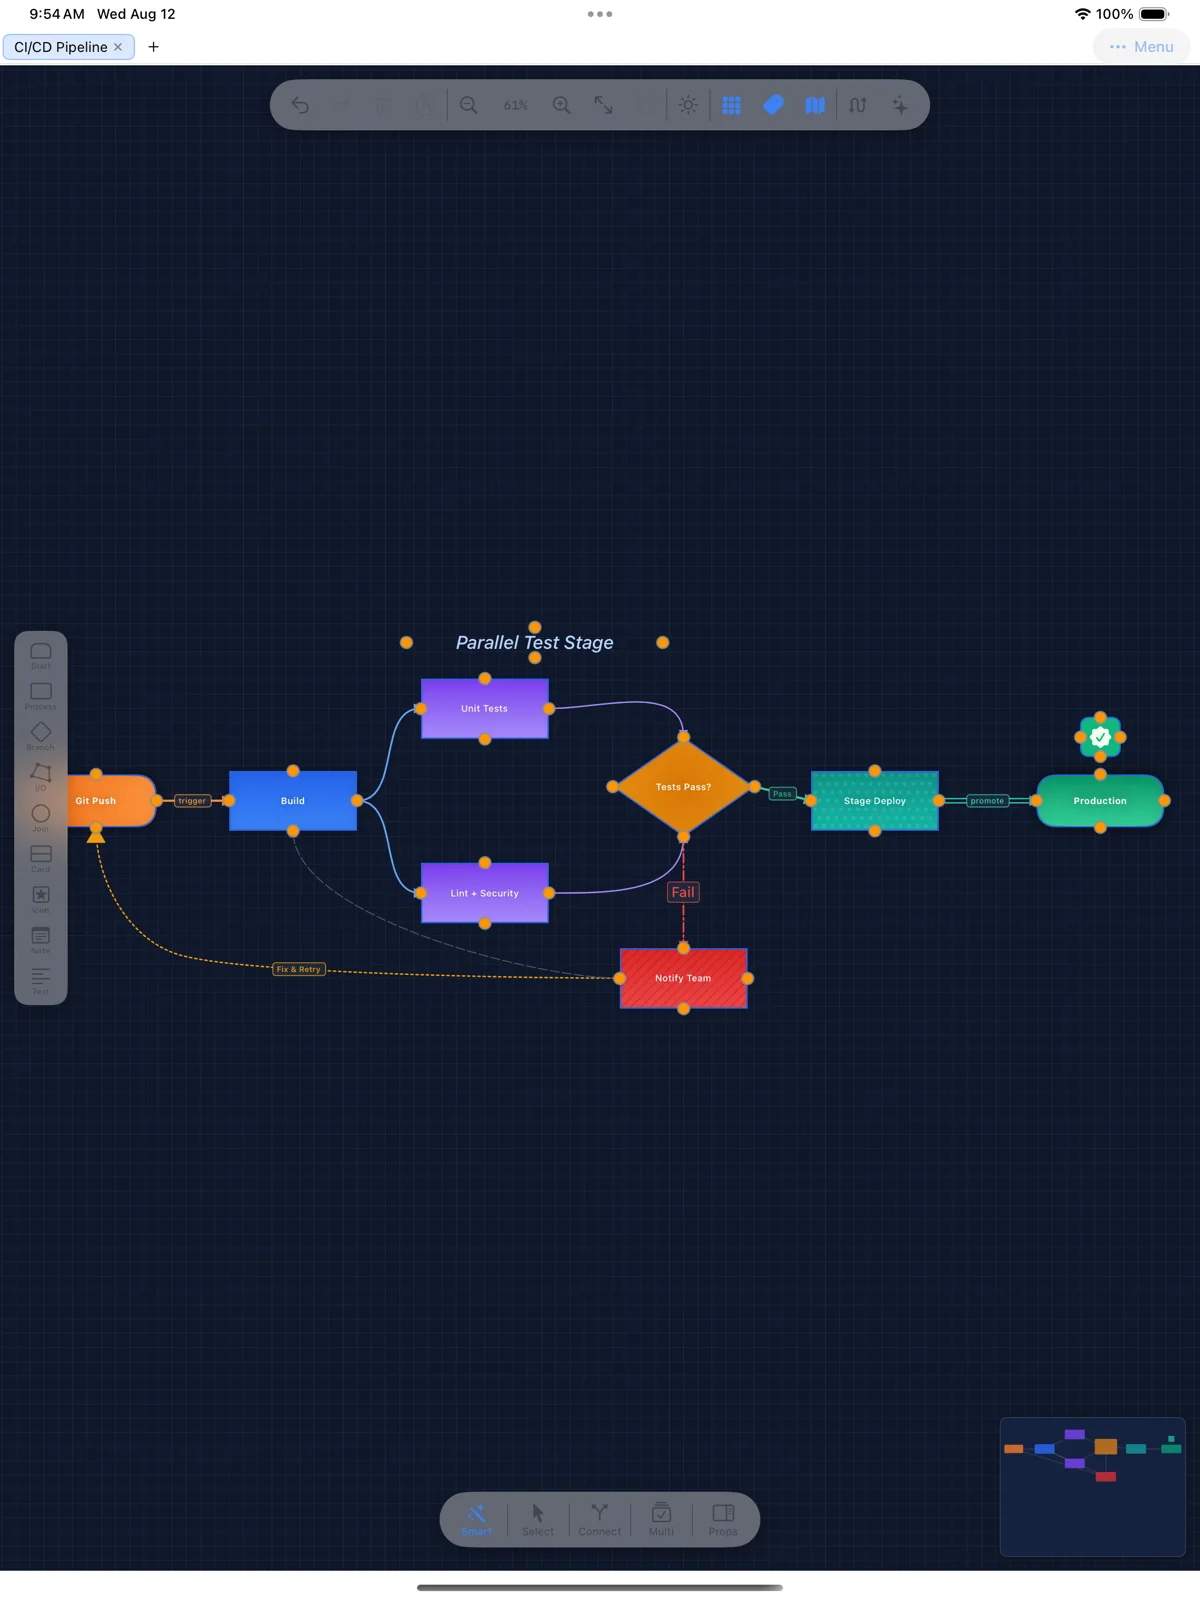
Navigating a larger flowchart on iPad — the minimap (bottom right) shows the visible viewport.
Node Types
Flowchart Designer includes seven node shapes, each suited to a different purpose in standard flowchart notation:
Start / End (1)— A rounded rectangle used to mark the beginning or end of a process flow.Process (2)— A standard rectangle representing an action or operation step.Decision (3)— A diamond shape for branching logic—typically Yes/No or True/False decisions.Input / Output (4)— A parallelogram indicating data input or output operations.Connector (5)— A small circle used as a junction point to simplify complex flows or connect across pages.Card (6)— A rich content card with a header, body text, and optional badges. See the Card Nodes section for details.Image (7)— An imported image or PDF. Press 7 or use File → Import Image (⌘I). See the Images & PDF section.
Adding Nodes
There are several ways to add nodes to the canvas:
- Palette click — Click a shape in the left sidebar to place it at the center of the canvas.
- Number keys — Press 1–7 to instantly add the corresponding shape.
- Import — Use
⌘Ito import an image or PDF file as a node.
Editing Nodes
- Move — Click and drag a selected node to reposition it.
- Resize — Drag any of the 8 resize handles around a selected node. For images, hold Shift or enable Lock Aspect Ratio to constrain proportions.
- Edit text — Double-click a node to edit its label text inline on the canvas.
- Properties — Select a node and use the right panel to change colors, fill style, text properties, and dimensions.
- Duplicate — Press
⌘Dor click Duplicate in the Properties Panel. - Delete — Press Delete or click the Delete button in the Properties Panel.
- Copy / Paste — Use
⌘Cand⌘Vto copy and paste nodes (pasted at a slight offset).
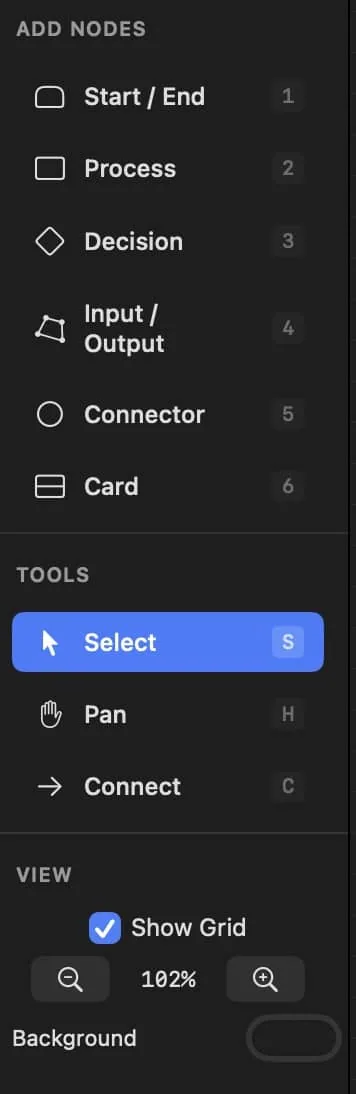
The node palette: each shape has a number-key shortcut (1–7).
Connections
Connections are directed lines (arrows) linking two nodes. They represent flow, data movement, or relationships.
Drawing Connections
- Press
Cto switch to the Connect tool. - Click a port (small circle) on the source node—top, bottom, left, or right.
- Click a port on the target node to complete the connection.
- Press Escape to cancel a pending connection.
For image nodes, you can click anywhere on the node surface to create a connection from that exact point, rather than snapping to a fixed port.
Labels
Select a connection and type a label in the Properties Panel. Use the Position slider to move the label along the line—0 is at the source, 0.5 is the midpoint, and 1 is at the target.
Waypoints
- Add — Double-click on a connection line to insert a waypoint. The line will bend through this point.
- Move — Drag a waypoint to reposition it.
- Delete — Select a waypoint and press Delete, or use "Clear All" in the Properties Panel.
Direction & Style
- Flip — Click "⇄ Flip" in the Properties Panel to reverse the connection direction.
- Bidirectional — Click "⇆ Bidirectional" to add arrows on both ends.
- Ports — Change source or target ports using the segmented picker in the Properties Panel.
Arrow Styles
Five arrow head styles are available for both the source and target ends:
- None — No arrowhead—a plain line end.
- Standard — An open V-shaped arrowhead (the default for the target end).
- Filled — A solid filled triangle arrowhead.
- Open — An outlined triangle arrowhead.
- Diamond — A filled diamond shape.
Line Patterns
Connection lines can be drawn in four patterns: Solid, Dashed, Dotted, or Dash-Dot. When using a non-solid pattern, adjust the Gap Spacing to control the distance between dashes or dots.
Auto-routing
Flowchart Designer can automatically route connections around nodes that overlap the direct path. This inserts waypoints so connections flow cleanly without crossing through other nodes.
- Single connection — Right-click a connection and choose "Auto-route" from the context menu.
- All connections — Click the auto-route button in the toolbar (arrow.triangle.swap icon) or use Edit → Re-route Connections to route every connection at once.
Auto-routing works by detecting which nodes lie in the direct path between the source and target, then adding two waypoints to detour around them. You can manually adjust the waypoints afterward if needed.
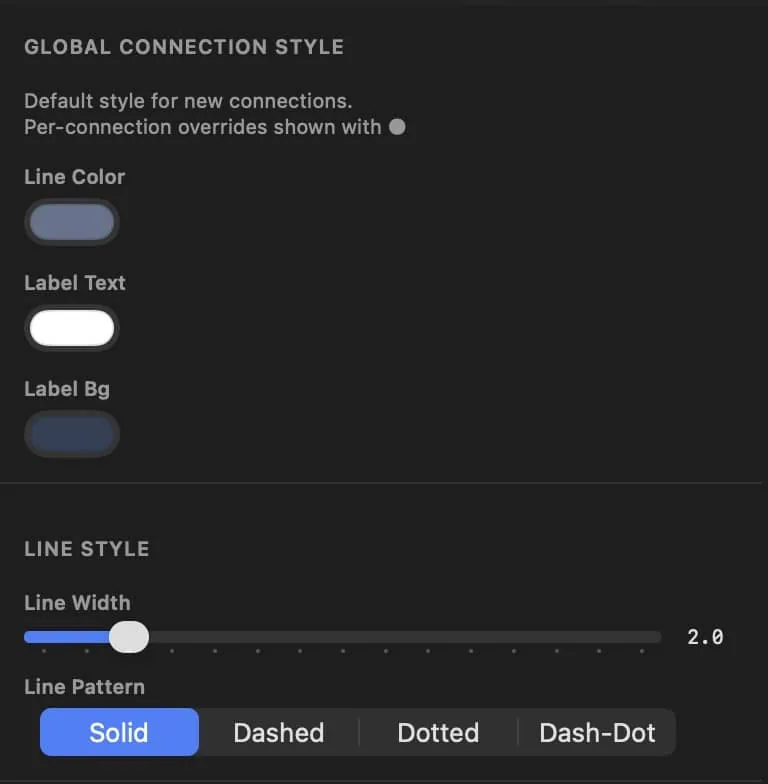
Connection styling: line color, labels, width, and pattern.
Styling
Flowchart Designer uses a cascading style system. Global styles set the defaults for all nodes and connections. You can then apply per-node or per-connection overrides without affecting other elements.
Global vs. Per-Element Styles
When nothing is selected, the Properties Panel shows the Global Connection Style and Global Node Style editors. Changes here set the default appearance for all new elements and any existing ones that haven't been individually customized.
When you change a color or style on a selected node or connection, it becomes a per-element override. Overridden properties show an orange dot (●) next to their label. Click the reset arrow (↩) to remove the override and revert to the global default.
Node Styling
- Fill Color — The background color of the node.
- Text Color — The color of the node's label text.
- Border Color — The color of the node's outline.
- Quick Colors — Click a color swatch for fast fill color changes. Use Custom for the full color picker.
- Reset All to Global — Remove all overrides on a node at once, reverting to global defaults.
Fill Styles
Nodes support three fill types:
- Solid — A single flat color (the default).
- Linear Gradient — A two-color gradient with an adjustable angle.
- Radial Gradient — A two-color gradient radiating from the center outward.
Additionally, you can add a pattern overlay on top of any fill type:
- Stripes — Diagonal lines across the node.
- Dots — A repeating dot pattern.
- Grid — A grid of horizontal and vertical lines.
- Crosshatch — Diagonal lines in both directions.
Patterns have adjustable color, spacing, line width, and opacity.
Connection Styling
- Line Color — The color of the connection line and arrowheads.
- Line Width — Thickness of the line (1–8 points).
- Line Pattern — Solid, Dashed, Dotted, or Dash-Dot.
- Arrow Size — The size of arrowheads (4–24 points).
- Label Colors — Customize the label text color and background color independently.
Typography
Flowchart Designer offers full text formatting controls including font family, size, weight, italic, underline, alignment, and letter spacing. These can be set per-node or as global defaults. See the Text Formatting section for complete details.
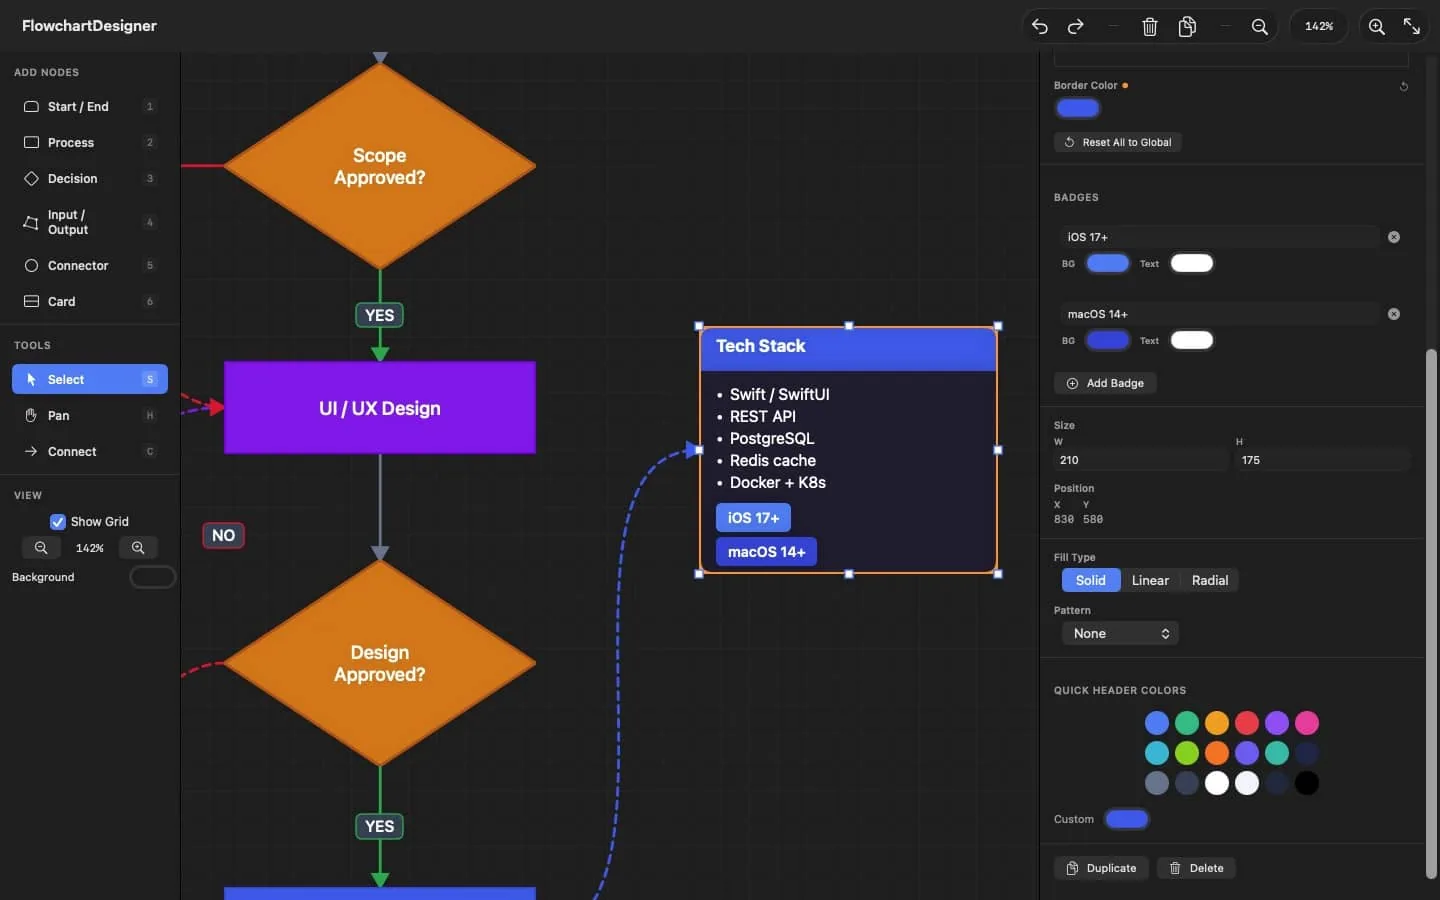
Per-node styling in the properties panel: fill, border, and quick colors.
Text Formatting
Every node supports detailed text formatting controls. You can customize the font family, size, weight, style, alignment, and letter spacing on a per-node basis, or set global defaults that apply to all nodes of a given shape.
Per-Node Overrides
Select a node and look for the Text Formatting section in the Properties Panel (below the color controls). Each property can be overridden independently. Overridden properties show an orange dot (●) next to their label, and you can click the reset arrow (↩) to revert to the global default.
Font Family
Choose from the system font (the default) or any font installed on your Mac. The font picker lists all available font families alphabetically. Selecting "System" reverts to the standard macOS system font.
Font Size & Weight
- Size — Adjust from 6 to 48 points using the slider or by typing an exact value.
- Weight — Choose from Light, Regular, Medium, Semibold, or Bold.
Style Toggles
- Italic (I) — Toggle italic rendering. The button highlights when active.
- Underline (U) — Toggle an underline beneath the text. The button highlights when active.
Text Alignment
Choose Left, Center, or Right alignment using the segmented picker. This controls how the text is positioned within the node's bounds.
Letter Spacing
Adjust the spacing between characters from –2 to 10 points. A value of 0 uses normal spacing. Positive values spread characters apart; negative values tighten them.
Card Nodes
Card nodes have two independent sets of text formatting controls:
- Heading text — Font, size, weight, style, alignment, and spacing for the card's header title.
- Body text — A separate set of the same controls for the card's body content, plus a Line Spacing slider to adjust the distance between lines of body text.
Global Text Defaults
When nothing is selected, the Properties Panel shows the Global Node Style editor. Under each shape's settings, you'll find Text Defaults with the same font controls. Changes here set the default text formatting for all new nodes of that shape and any existing nodes that haven't been individually customized. Card shapes also show a Body Text Defaults section.
Export Support
All text formatting is preserved when exporting. SVG exports include font-family, font-weight, font-style, text-decoration, and letter-spacing attributes. PDF and PNG exports render text using the exact fonts installed on your system.
Card Nodes
Card nodes are rich-content containers ideal for detailed information, documentation blocks, or data summaries. They feature a colored header, scrollable body text, and optional badges.
Structure
- Header — A colored banner at the top displaying the card's title. Edit the heading text and header colors in the Properties Panel.
- Body — A multi-line text area below the header. Supports bullet points (•) and bold text (**text**).
- Badges — Small colored tags at the bottom of the card. Use them for status indicators, categories, or callouts.
Editing Body Text
The body text editor in the Properties Panel includes a formatting toolbar with Bold (B) and Bullet (•) buttons. Drag the resize handle below the editor to make it taller or shorter.
Formatting uses a simple text convention:
- Bold — Wrap text in double asterisks: **bold text**
- Bullets — Start a line with • (the bullet character, inserted by the toolbar button).
Badges
Add badges by clicking "Add Badge" in the Properties Panel. Each badge has:
- Text — The badge label (e.g., "In Progress", "v2.0").
- Background Color — The badge's fill color.
- Text Color — The badge's label color.
Click the ✕ button next to a badge to remove it. Badges are displayed as rounded pills at the bottom of the card.
Card Colors
- Header Color — The background color of the header banner.
- Header Text Color — The heading text color.
- Body Color — The background color of the body area (uses Fill Color).
- Body Text Color — The color of the body text (uses Text Color).
- Border Color — The card's outer border color.
Images & PDF
Import external images and PDF files as nodes on your canvas. Image nodes participate in connections and can be styled like any other node.
Importing Images
Use File → Import Image (⌘I) or press 7 to open the file picker. Supported formats:
- Raster images — PNG, JPEG, GIF, TIFF
- Vector documents — PDF (first page is imported)
PDF Import
When you import a PDF file, Flowchart Designer stores both a high-resolution rasterized preview (for fast canvas display) and the original PDF data. This gives you the best of both worlds:
- Canvas display — A crisp 2× DPI rasterized image for smooth interaction.
- PDF export — When you export your flowchart as PDF, imported PDF nodes are rendered as true vector graphics—no quality loss at any zoom level.
- PNG / SVG export — Uses the high-resolution rasterized image.
Aspect Ratio
Image nodes default to a locked aspect ratio. When resizing:
- Shift + drag — Hold Shift while dragging a resize handle to constrain the aspect ratio (works on all nodes).
- Lock toggle — For image nodes, a "Lock Aspect Ratio" checkbox appears in the Properties Panel. When enabled, all resize operations maintain the original proportions.
Connections on Images
Unlike standard nodes with four fixed ports, image nodes support click-anywhere connections. In the Connect tool, click any point on the image surface and the connection will originate from or terminate at that exact position. The connection's curve direction is automatically determined based on the nearest edge.
Grouping & Layers
Grouping Nodes
Select multiple nodes and press ⌘G to group them. Grouped nodes move together as a unit when you drag any member of the group. Press ⌘⇧G to ungroup.
To select multiple nodes: Shift-click individual nodes, drag a marquee selection on empty canvas, or press ⌘A to select all.
Multi-Select Operations
When multiple nodes are selected, the Properties Panel shows:
- Alignment tools — Align nodes by their left, center, right, top, middle, or bottom edges.
- Distribution — Distribute H and Distribute V evenly space three or more nodes.
- Quick Colors — Apply a fill color to all selected nodes at once.
- Duplicate / Delete — Operate on the entire selection.
Auto-layout (Tidy Up)
When your flowchart gets messy, use the Tidy Up feature to automatically arrange selected nodes in a clean tree layout based on their connections.
- Properties Panel — Select 2 or more nodes and click the "Tidy Up" button in the Layout section of the Properties Panel.
- Menu — Edit → Tidy Up Selection.
⌃⌘ T— Tidy Up Selection — Arrange selected nodes in a tree layout centered on the current selection.
The layout algorithm follows the direction of your connections to determine parent-child relationships, placing root nodes at the top and arranging children in layers below.
Z-Order (Layering)
Nodes are drawn in the order they were created. Use these commands to change the stacking order:
⌘ ]— Bring to Front — Move the selected node(s) to the top of the stack.⌘ [— Send to Back — Move the selected node(s) to the bottom of the stack.⌘ ⌥ ]— Bring Forward — Move up one layer.⌘ ⌥ [— Send Backward — Move down one layer.
Export & Import
Saving & Opening Projects
Flowchart Designer saves projects as JSON files. This format preserves all nodes, connections, styles, waypoints, and image data.
⌘ S— Save Project — Choose a location and save as a .json file.⌘ O— Open Project — Load a previously saved .json project file.
When you close the app with unsaved changes, you'll be prompted to save first.
Exporting Images
⌘ E— Export as PNG — A high-resolution raster image suitable for presentations and documents.⌘ ⇧ E— Export as PDF — A vector-quality document. Imported PDF images retain full vector fidelity.⌘ ⇧ S— Export as SVG — A scalable vector graphic for web use or further editing in vector editors.
All export formats render the full canvas content with a small margin around the bounding box of your nodes and connections. Custom text formatting (fonts, italic, underline, letter spacing) is fully preserved in all export formats.
Importing Images
⌘ I— Import Image — Bring in a PNG, JPEG, GIF, TIFF, or PDF file as an image node on the canvas.
Clear Canvas
File → Clear Canvas removes all nodes and connections, giving you a fresh starting point. This action can be undone with ⌘Z.
AI Assistant
Flowchart Designer includes an AI-powered assistant that can help you plan and generate flowcharts from natural language descriptions. Chat with the AI to refine your ideas, then generate a complete flowchart with one click.
Opening the AI Panel
There are several ways to open the AI Assistant:
- Toolbar — Click the sparkles (✨) icon in the toolbar.
- View menu — View → AI Assistant (
⌘). - File menu — File → Generate with AI… (
⌘⌥G).
The AI panel appears at the bottom of the workspace. Use the same controls to toggle it closed, or click the ✕ button in the panel header.
Setting Up API Keys
The AI Assistant uses a Bring Your Own Key (BYOK) model—you provide your own API key from the AI provider of your choice. Your keys are stored securely in the macOS Keychain and are never transmitted anywhere except to their respective provider.
To add an API key, open Settings (⌘,) and go to the AI tab. You'll see a section for each supported provider:
- Anthropic (Claude) — Get a key from console.anthropic.com. Provides Claude Sonnet and Claude Haiku models.
- OpenAI (GPT) — Get a key from platform.openai.com. Provides GPT-4o and GPT-4o Mini models.
- Google (Gemini) — Get a key from aistudio.google.com. Provides Gemini 2.5 Pro and Gemini 2.5 Flash models.
- xAI (Grok) — Get a key from console.x.ai. Provides Grok 3 and Grok 3 Mini models.
Each provider section includes a direct link to their API key console. Paste your key and click Save Key. You only need to set up the providers you want to use.
Chatting with the AI
The AI panel has a chat interface on the left where you can have a conversation before generating:
- Type a message describing what you want to create and press Return to send.
- The AI will respond with suggestions, clarifying questions, and recommendations for your flowchart.
- Continue the conversation to refine the scope, structure, and details.
- When you're satisfied with the plan, click Generate (
⌘↩).
The full conversation is used as context when generating, so the AI produces a flowchart that matches everything you discussed.
Generating a Flowchart
Click the Generate button on the right side of the panel. The AI will produce a complete flowchart with nodes, connections, colors, and layout based on your conversation or prompt.
- Single-shot — If you skip the chat and just type a prompt, click Generate to create a flowchart directly.
- With context — If you've been chatting, the entire conversation informs the generation.
- Regenerate — After a flowchart is created, click Regenerate to produce a new version. Add instructions in the text field to guide changes.
- New Chat — Click the reset (↺) button in the header to clear the conversation and start fresh.
Choosing a Provider & Model
The right side of the AI panel has Provider and Model pickers. Switch between providers at any time—only providers with a saved API key will be functional. Each provider offers two models: a more capable option and a faster/cheaper option.
Tips
- Be specific — The more detail you provide about your flowchart's structure, the better the result. Mention node types, branching logic, and edge cases.
- Iterate — Generate once, review the result, then chat about adjustments and regenerate.
- Try different models — If one model's output isn't quite right, try another provider or model for a different interpretation.
Settings
Open Settings with ⌘, (comma) or from the app menu. The Settings window has four tabs:
General
- GPU Rendering — Enable Metal-based compositing for potentially better performance on large documents.
- Show Grid — Toggle the dot grid background on the canvas.
- Canvas Background — Set the default background color for new documents.
Node Styles
Configure default appearance for each node shape. Select a shape from the segmented picker, then adjust:
- Colors — Fill, text, and border colors. Card nodes also have header and header text colors.
- Fill Style — Solid, linear gradient, or radial gradient. Plus optional pattern overlays.
- Text Defaults — Font family, size, weight, italic, underline, alignment, and letter spacing. Card nodes have separate heading and body text defaults.
Click "Reset [Shape] to Factory" to restore the original defaults for a specific shape.
Connections
Set default connection appearance: line color, label colors, line width, dash pattern, arrow styles, and arrow size. These defaults apply to all new connections and any existing ones without per-connection overrides.
Import / Export
- Export Settings — Save all your default styles to a JSON file for backup or sharing.
- Import Settings — Load styles from a previously exported settings file.
- Reset All — Restore every setting to its original factory value.
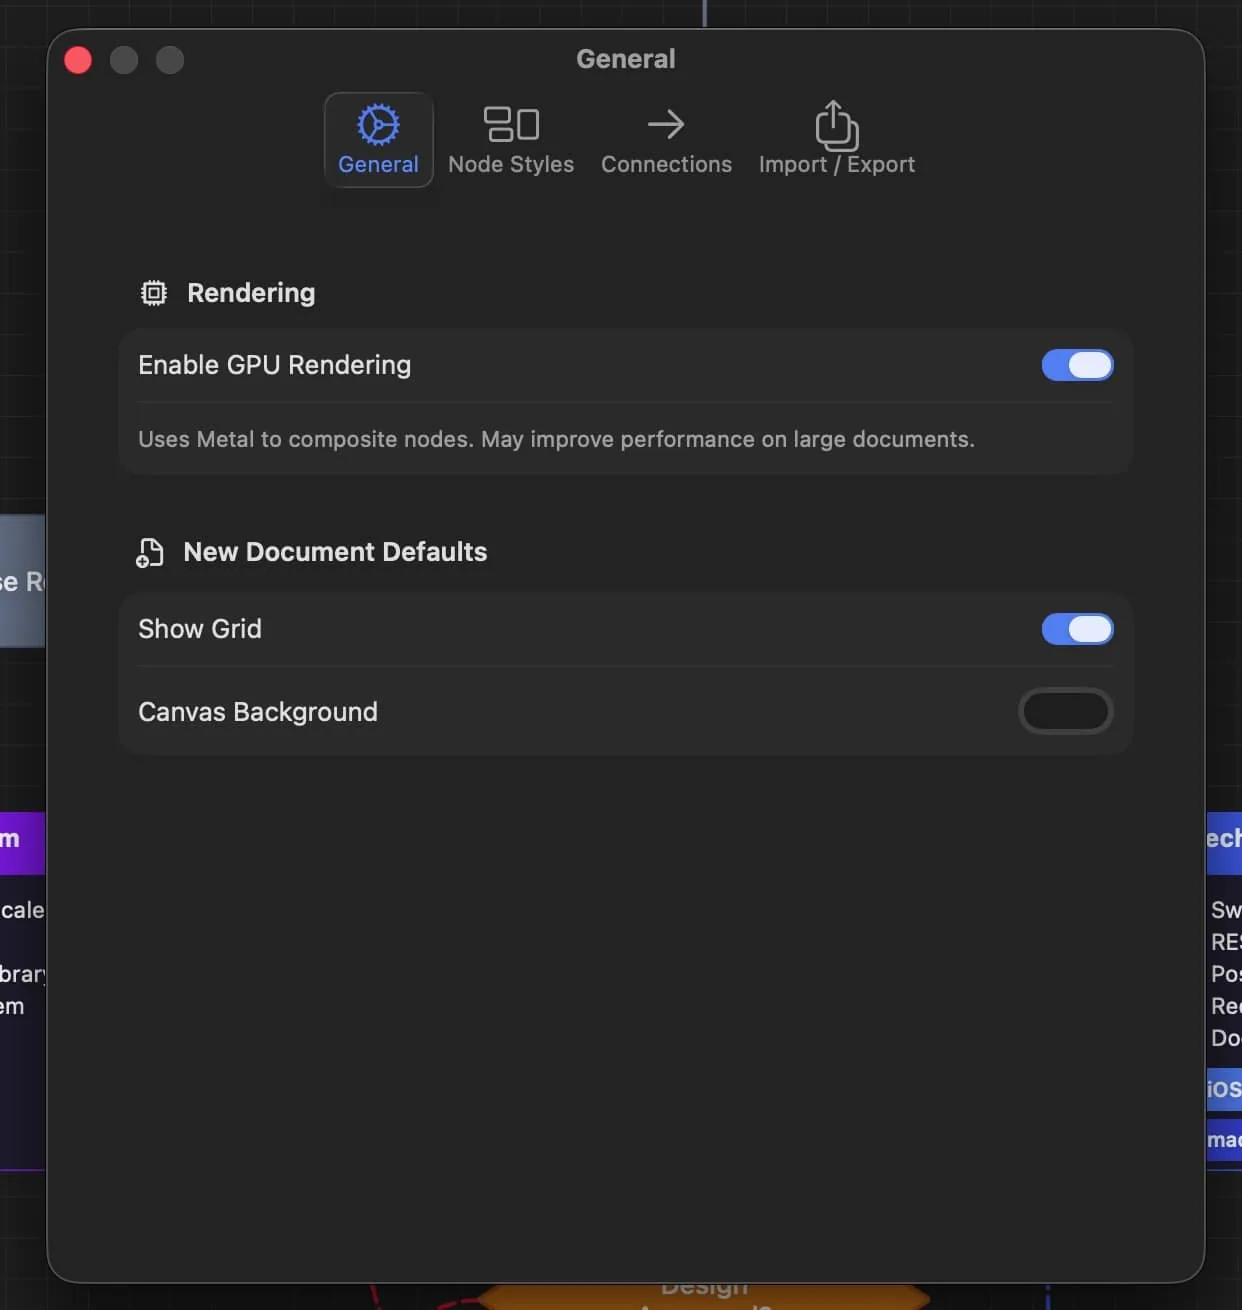
Settings → General: GPU rendering, grid, and canvas background.
Tips & Tricks
Workflow Tips
- Quick tool switching — Press
Sfor Select,Cfor Connect,Hfor Pan. Hold Space for a temporary pan from any tool. - Fast node creation — Use number keys 1–7 to add nodes without touching the palette.
- Inline editing — Double-click any node to edit its text directly on the canvas.
- Undo everything — Nearly every action supports Undo (
⌘Z) with up to 50 levels of history.
Alignment & Layout
- Precise alignment — Select 2+ nodes and use the alignment buttons in the Properties Panel to align edges or centers.
- Even distribution — Select 3+ nodes and use Distribute H or Distribute V to space them evenly.
- Size fields — Type exact pixel dimensions in the Size fields in the Properties Panel for precise control.
Connection Tips
- Route connections — Double-click a connection line to add waypoints. Drag waypoints to create clean routing around other nodes.
- Label positioning — Use the Position slider to place connection labels exactly where you want them along the line.
- Quick direction — Use the Flip and Bidirectional buttons in the Properties Panel for fast direction changes.
Style Efficiency
- Design globally first — Set up your global node and connection styles—including text formatting—before building your flowchart. All new elements will inherit these defaults.
- Override indicator — Look for the orange dot (●) next to property labels to see which properties have been customized on a specific element.
- Batch reset — Use "Apply to All" in the global style editor to strip all per-element overrides and enforce a uniform look.
- Settings portability — Export your style presets from Settings → Import/Export and share them with teammates or across machines.
Layout & Navigation
- Auto-layout — Select a group of connected nodes and press
⌃⌘T(Tidy Up) to automatically arrange them in a clean tree layout. - Auto-route — If connections cross through other nodes, use the auto-route toolbar button to automatically add waypoints that route around obstacles.
- Minimap — Press
Mto toggle the minimap—a bird's-eye overview of your entire flowchart that helps you navigate large diagrams. - Inline font matching — When you double-click a node to edit its text, the inline editor matches the node's font settings so you see exactly what the final text will look like.
Keyboard Shortcuts Reference
For a complete list of keyboard shortcuts, go to Help → Keyboard Shortcuts.
Still have a question? See the product page for a quick Q&A, or get in touch — a real person answers.